Have you ever been to a wood floor technical school? What I have found over the years is that wood floor contractors are passionate people. They will spend hours discussing and arguing any wood-related topic out there, except … you got it: moisture.
Moisture is boring. Moisture testing is even more boring. In fact, I remember being a student at the certified inspector school watching the instructors showing how to conduct a moisture test. I chose to spend money, time and energy to attend that school. I love the trade, I breathe, eat and drink wood fibers 24/7. Still, your fellow man here was standing bored out of his mind during those moisture test demos. Give us some power tools and wood, right? That's exciting! But things like MVER, RH, ASTM, really? What does it even mean? That's as boring as it gets.
I got over myself my first year in business when I had one of my floors cup. It was way before I joined the NWFA and way before any technical training. It is like that last scene in that movie-I forget-"King Kong ain't got nothing on me!" Well, guess what? You got something on me now. Okay, like I tell Wayne Lee, focus!
RELATED: Avoid These Mistakes When Moisture Testing Wood Floors
So, what does it mean "I got over myself"? It means that I acknowledged even the most boring tasks were part of my responsibility and necessary for a successful floor installation. No matter how hideous and time-consuming, and no matter how many trips I needed to make to a job site, when I do floors I prepare the subfloor according to established proven industry guidelines and beyond. By beyond, I mean I seal my slabs even if a barrier is not required at the time of testing. The two most common tests are Calcium Chloride (CC) and Relative Humidity (RH). Though both are reliable, the trade seems to be going into the RH future. We will discuss the RH and RH vs. CC in the next blog posts. Let's start with the CC.
This test was developed (it comes from the world of resilient floor covering) to measure moisture vapor emission over 1,000 square feet in a period of 24 hours. The vapor is measured in pounds. So, if you read the guidelines and they say that you need a vapor barrier with a test result of over x pounds, now you know what the pounds mean. What's in the test kit?
- A pre-weighed plastic jar with CC.
- A transparent plastic cover.
- Instructions and usually other items for testing PH and different labels.
First you need to grind down an area for the test. Don't put the test over paint, leveling compounds or anything short of directly onto the concrete. Wait 24 hours before placing your test. It is crucial that you follow the instructions on the test kit. If you don't and the floor fails, the test will not hold in court (but you're never going to court because you are reading and implementing my advice, right?). A word about the legality of your test: It must be by the book. That means it needs to comply with ASTM and not just the manufacturer instructions. The CC test is referred to as ASTM F1869. What is ASTM?
American Society for Testing and Materials: ASTM International, known until 2001 as the American Society for Testing and Materials (ASTM), is an international standards organization that develops and publishes voluntary consensus technical standards for a wide range of materials, products, systems, and services.
Okay, so you had the concrete prepared. You waited 24 hours. You come back and weigh the plastic jar with a gram scale. Buy one online. Yes, in the evening after you had a drink or two and you start Amazon shopping for stuff you don't really need, add to your list something you do need: a gram scale. It's $40. It will save and make you money, guaranteed. The plastic jar comes pre-weighed, but you want to confirm that weight just in case. Put the jar on the concrete and seal the plastic cover over it. Wait three days (I believe last time I checked it was between 60-72 hours). Then come back and weigh the jar again. The instructions come with a formula. All you have to do is put the numbers in there and you get a result. You could also send the jar back to the manufacturer for the results.
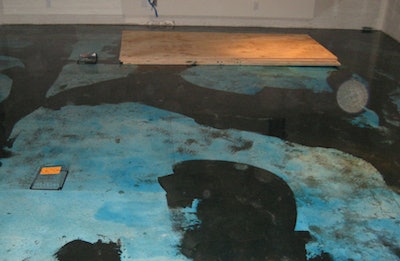
 This photo shows calcium chloride tests tests being done AFTER we sealed the concrete. Why? Because that was the first job I did using that epoxy sealer, so I tested before and after we sealed the slab. The reading before the epoxy was 3.8 lb.; after sealing the slab the reading was 0.4 lb.
I will take the next blog from here in a couple of weeks. Your input, whether comments, suggestions, opinions, rants, adding to what's already here or questions, are always welcome.