As wood floor professionals (here in Australia we would say "timber floor"), what we do with the first boards we pick up is vitally important to the outcome of the floor—but also vastly different from contractor to contractor. Some pros will simply use these boards as their starter row, either from the longest wall, the center of the room or from the most difficult part of the job.
I'm not here to say what is right or wrong, but to explain what we have been doing with those first boards for many years at Scribed Flooring. For us it is a ritual on every single job, whether it's a glue-down, nail-and-glue-down or a floating floor. (Down Under we never just nail down a floor, but that's a topic for another article.) It's not new, but it is certainly one of our best practices: Before we even take moisture readings or acclimate the floor, we take a 10-board measurement to get an average board width.
Why? Expansion is arguably one of the most vital considerations when installing a wood floor. We have been taking these 10-board measurements for many years and have observed flooring that is supplied both wider and narrower than the stated manufactured width. We have found this not just during high humidity times of the year, as you would expect, but also occasionally during drier times of the year. This includes both undersized and drastically oversized product in the same brand and style from one manufacturer only two weeks apart—and this in the height of our Queensland humid summer! When we recognize this before the installation we can avoid the majority of problems later.
The 10-board measurement
The 10-board measuring method is simple:
1) Take two boards each out of five random packs or bundles and join them together at their edges (long sides).
2) Measure accurately with a tape measure (using the first edge on the 100-mm mark of the tape measure—or for non-metric-system pros, the 1-inch mark).
 Photo 1
 Photo 2
 Photo 3
3) Use your smartphone to take three photos: one at each end of the tape measure (photos 1 and 2) and also an overall board span photo (photos 3).
Here is what we do then:
1) Measure the floor width to be laid.
2) Divide that overall floor width by the average board width (as calculated over 10 boards).
3) Do some simple math to work out how much the board has grown in relation to the width of the floor and possibly adjust our expansion allowance.
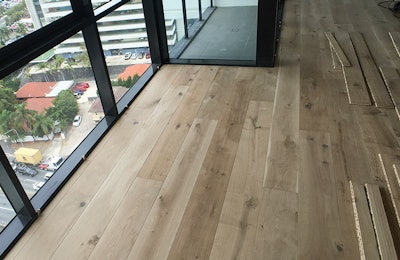
The example above (a full-trowel glue-down install) shows us measuring the flooring that was installed in the project shown on the first page of this article.
The measurement across 10 boards is 2,402 mm (7.88 feet) (remember, we started at the 100-mm mark), so we know the average width of our engineered oak plank is 240.2 mm (9.46 inches) prior to installation. If it were accurately on-size, our 10-board span should have measured 2,400 mm (7.87 feet).
If we are doing a floor that is 6 meters (19.69 feet) wide, that would already be approximately 5 mm (0.2 inch) of expansion:
6,000 mm divided by 240 = 25 boards
25 boards X .02 mm = 5 mm.
Note this expansion happened prior to installation.
On this job, from our years of experience doing these measurements in this climate and with this product, we expected the floor would expand even more once installed, so we subsequently added small gaps (2.5 mm) between some areas and tiny gaps 0.25 mm (single business card) randomly throughout the floor, and, as we expected, these closed up over the following weeks.
With our experience doing what we call "the 10-board," we now have 100 percent confidence in jobs like this. It's like having a crystal ball; we know exactly what the floor will do and can incorporate the necessary expansion where it will be needed.
 Photo 4
 Photo 5
An example: Two floating bamboo floors
Our next example is two jobs that were 10 days apart with the same product from the same manufacturer. Both of the floors were floating bamboo products that should measure 137 mm wide per board, and of course should measure 1,370 mm over 10 boards.
On one of our jobs the 10-board span was 1,373 mm, showing an average board width of 137.3 mm (photos 4 and 5). That equates to 13.2 mm (more than a half inch!) expansion over a 6-meter floor width prior to installation:
6,000 mm divided by 137 = 44 boards
44 boards X .03 mm = 13.2 mm.
 Photo 6
 Photo 7
Ten days later, the second job with the exact same product in a different color had floorboards that were on size (photos 6 and 7)—in other words, zero expansion prior to install!
If both these floors were installed with the same considerations to expansion, we would have two very different results. Both jobs had areas that were both wide (nearing 6 meters) and tight (between a kitchen and tile step), and they were floating installs done in February (our humid summer). Given the same amount of expansion, the first job (that had already expanded prior to the installation) would show few signs of any issues, while the second would possibly expand until it touched the vertical surfaces, creating problems.
RELATED: Take Steps to Avoid Noise Complaints with Floating Floors
An example: An undersized floor
As we have been doing this for many years and with lots of our own data, we know that for our local installations, here in a very humid coastal climate, the average expansion of floating engineered floorboards per meter is around 3.5 mm as a very rough guide (to an extreme of 4.5–5 mm depending on product type and installation). We have observed even more extreme expansion from water damage or an unusually dry product. Note that we have found this is also about the same for solid glued floors.
Let's take a look at another example:
- The floor width is 6 meters.
- The stated manufactured board size of our floating engineered flooring is 135 mm.
- The actual board width is 134.8 mm—note that this is undersized.
From experience, I know this board could easily expand to 135.4 mm, and that my instructions say to leave a 12-mm gap on both sides of the room (remember that floating floors expand as if they were one giant piece of flooring since they aren't attached to the subfloor).
Now it's time for some more math:
6,000 mm (the width of our room) / 134.8 mm (our actual board width) = 44.64 rows of boards
Now I'll calculate how much expansion I anticipate. So:
44.64 boards X 0.6 mm (my potential expansion per board) = nearly 27 mm possible expansion
That's more than twice as much as the recommended 12 mm! Now I know I will have to either leave more space or undercut my plasterboard at the walls.
Knowing your product & environment
The more jobs we measure, the more we see subtle differences and the more patterns are observed. Also, we often have a chance to visit jobs some time after the installation and always measure and look back at original sizing. After years of practicing this technique, along with always taking humidity and moisture content readings, we have gathered a great deal of data, knowledge and confidence in predicting what a floor may do in the future in our local area.
Prior to doing the 10-board, we would install floors, taking only pre-installation moisture readings and acclimating the product. Instructions were followed and customers were satisfied. This was my method for over 10 years and, during that period, every now and then there would be the odd problem—anything from creaking in the floor to some deflection or peaking in the joints. Once we even had a floor shrink out from under the skirting (what you call "baseboard") by 8 mm (0.3 inch) on each side of the room!
We never really knew why a floor had a particular issue, and thankfully none were major failures. We just fixed them and mostly guessed why it happened. Shortly after starting to take and record our 10-board measurements, we started to see very different sizes in board widths prior to the installations, and what we came to observe was that some boards were constantly 3 mm wider per 1,000 mm of width, or they were close to the manufacturer's stated size. With the product that was close to the manufacturer's size we knew, or subsequently confirmed, if it had immediately come in from a drier climate.
 When we know flooring is undersized at installation, sometimes business-card-sized gaps are all we need to avoid trouble later.
We have since worked out how "big" a particular board will get (we are located in a hot and humid city), and we have cut these niggling issues and problems to zero by making allowances for correct expansion at either side or by adding space within rows. I know if a floor expands beyond what I know to be a "normal maximum" it has either encountered an unusual amount of moisture (possible flooding or over-mopping) or the product has a manufacturing issue (from being produced too dry or some other unknown issue).
RELATED: Understand the Science of Water and Wood Floors
Other major benefits
Doing the 10-board can help in other ways:
Help during inspections: A few years ago we had a builder request an inspection of our work, as he claimed (among other things) that we had not left any expansion. We were able to supply the inspector the three photos of the product's 10-board measurement and explained how we were able to incorporate expansion allowance within the floor. We also showed that with our data, the floor would be more likely to have shrinkage rather than expansion. The inspector could see we had taken care to allow adequate expansion, and these photos, calculations and explanations reflected favorably in that report in regard to the builder's claims. I'm sure if we had not had the 10-board measurement photos, things may well have been different.
Working with manufacturers: More than once I have had to call a manufacturer to say I was having problems with a floor (during and, sometimes, after installation). The first thing that happens is they start asking questions: "Have you done XYZ?" and "Have you followed ABC?" After I email my photos of the time-stamped 10-board measurement along with a few other pre-installation checks, the language changes from the above to, "How can we work together to resolve this problem?"
Seeing things you might not otherwise notice: There have been times I have started installing jobs, and they look perfect to the naked eye. Then I take a photo and suddenly you can see "scalloping" in the reflection on the picture. This sometimes is detected in the photo of the 10 boards.
A useful ritual
The 10-board measurement takes minutes to do. It's not a new technique, but the photos nowadays are geotagged and time/date stamped, and they are generally stored in the cloud or in a smartphone. This data storage is a new use of an old method.
I urge all professional installers to make this a ritual to add to your toolbox—not to replace your usual moisture readings and acclimation practices. It cannot hurt, and you will gain knowledge based on facts. More than likely, as it has for me, it may save you a costly tear-out, too. Knowledge is power.
See all of Greg Ceglarski's articles from WFB here.
The growing bamboo
This was a solid bamboo floating floor that, over time, kept expanding and expanding—so much that we had to do relief cuts in the floor. We had pictures of the growth in width documenting everything. The supplier claimed the problems were all due to incorrect installation, but "in the interests of customer relations" they were willing to pay to have the problems with the floor corrected. I am skeptical they would have paid without our 10-board photos. |


A final word: Know your climate & your product
It's critical to know your climate, your products and your job sites. For example, here in Brisbane, on Australia's east coast, we have maybe six weeks of "winter" during which we typically still get flooring from our supplier that measures big compared to its stated size. If we left that flooring to acclimate on site down to its "correct" size at that time of year, we would end up with a bad floor once it adjusted to our more typical humid climate. Instead, we need to make sure we get the floor installed before it acclimates! Taking 10-board measurements will help only if you understand what they mean for the particular product you're installing and the climate changes your flooring will experience all year. |