


In today's complex hardwood flooring industry, there are myriad molding thicknesses and colors. Because of this, distributors have difficulty keeping all moldings in stock. However, when you need to produce matching molding quickly on the job, it can be as easy as adapting one transition to the one that works best for your floor. The following methods work when you use moldings that are at least the same color as the flooring you're installing.
The most common molding profiles available include stair nose, reducer, T-mold and baby threshold. The profiles that tend to present the most problems on the job are the stair nose and the reducer. These two moldings must match the thickness of the flooring exactly. T-molds and baby thresholds are more adaptable in their standard sizes and don't require any reshaping.
Nosing Around

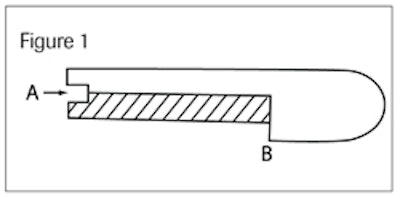
Let's start with stair noses. You can actually take a stair nose and adapt it to any flooring thickness between 1/4 and 3/4 inch. The only requirement is a portable table saw or a bench saw, which every flooring contractor should own. For this example, I'll describe how to reduce a 3/4 -inch stair nose to 1/2 inch. If you look at the profile of a stair nose (see Figure 1), you see that with only two passes—or cuts—on your table saw, you can create a new stair nose that perfectly matches your 1/2 -inch requirement. The first cut is line A, and the second cut is line B, although the order of these cuts does not matter.
Conversely, if you need a thicker stair nose than what is available, a filler piece can be cut to fit under the stair nose to match the thickness of the existing floor. The only limiting factor is the bottom of the bullnose, which must cover all subfloor material.

In Figure 2, the same cuts from Figure 1 are done but in a way that creates a floating floor stair nose from a regular 3/4 -inch stair nose. On floating floors, some under-padding material may be too thick to allow for the over-lap-type stair nose. In this case you may have to put a spacer under the stair nose to allow for the overlap.
You can now adapt just about any stair nose to the thickness you need. If you use unfinished molding, you can stain and finish to match.
Reducing It

Reducers are just as easy. If you can't get the reducer with the thickness you need, start with a thicker reducer or one that is thicker than the differential of the two adjoining surfaces. To get the actual thickness required between two surfaces, lay the reducer flat on the lower surface and slide the end against the higher surface.
Use a sharp pencil to draw a line across the end as illustrated in Figure 3, line A. Notice where the line intersects the top of the reducer and scribe a vertical line from this point as shown in Figure 3, line B. With your table saw, rip the reducer to the left of the vertical line. The result is a perfectly matched reducer custom fit to your job requirements.
Although this creates a narrower reducer, it should satisfy the functional requirements. The wider the original reducer, the better this technique works. The aesthetics depend on how well you carry out these techniques. Although it seems like you can just shave off the difference on the bottom side or the flat side of the reducer, this can be dangerous because most reducers are too thin to effectively cut on a power saw.
To a "T"
Adapting T-molding and baby thresholds to a floor is less difficult. You can shave off the foot of the "T" or baby thresholds to match the floor, or cut a filler piece to lengthen the foot to accommodate thicker flooring. The feet of both of these moldings should rest on the subfloor. If you have to add filler under the foot of the baby threshold, it is usually hidden. Many contractors use this method to transition from hardwood flooring to carpeting, fireplace hearths and patio doors. Typically, all you see on the finished job is the top portion of the molding. Of course with T-moldings, the foot is never visible on the finished job, so a filler piece added to the bottom never shows.
As with any type of work you do on the job, it's in your best interest to use the proper techniques to ensure quality for your consumer. Don't be afraid to cut and reshape a standard piece of molding to adapt to your situation when you don't have the proper transition for the job. Transitions are essential to the function and appearance of any job. If you satisfy both these criteria, you'll have a satisfied customer.


