


 This custom-built jig, consisting of a plywood sled that glides across a saw table, is designed to cut all the pieces necessary for a French knot pattern.
Contractors can get intimidated by the thought of making wood floors that involve lots of repetitive custom cutting. For example, cutting your own French knots can be time-consuming, requiring lots of patience. But, ever since I made a jig that has all the cuts premeasured, it takes no time at all to cut my own French knots. The jig we're illustrating here is my French knot jig, but you can design a jig for any pattern imaginable. All you need is a little patience, a lot of precision and some elementary geometry. You'll save money compared with buying pre-cut patterns, and you'll save lots of time not trying to measure and hand-cut multiple pieces. Best of all, you'll have the satisfaction of knowing that every piece of the job was created by your hands alone. The jig we're describing here can be constructed with materials you probably have on hand—except perhaps the toggle clamps I like to use to hold boards firmly in place while cutting.
Necessary tools and supplies:
- Table saw with cross-cut blade
- Toggle clamps
- Router
- Screwdriver
- Drafting square
- Scraper
- Drill with countersink bit
- Protective eye wear
Step 1:

Three layers of plywood build the end fences high enough so the saw blade will not cut through the fence (below left), rendering your carefully built jig a dysfunctional two-piece unit. The fences also serve as excellent hand-holds while you're sliding the sled across the saw table. Also, make sure there are no nails or screws at the point where the saw blade will cut through.
Step 2:

To be able to move the sled accurately across the saw table, you'll need to install guide rails on the bottom to fit into the tracks on the table. Place the first guide rail based on where you'd like the sled to fit on the saw table. To place the second guide rail, cut a piece of plywood the exact width of the space between the tracks. Then, fit the second guide rail tight against the plywood.
Step 3:

To make sure the rails slide smoothly and freely, coat the sides of the track with graphite, then slide the rail through the track. The high points will be marked by graphite, and you can scrape them down until the guides slide smoothly through the tracks.
Step 4a:

Since the tongue and groove are not centered on most flooring, the groove on the cutting fence needs to be routed out so that the tongue on the boards to be cut will fit into the groove, even if you need to flip a board.
Step 4b:

Set your router to the proper depth for the flooring you're using. Then, flip the boards you're planning to use for cutting fences and re-rout the groove.
Step 5:

Another key to making precision cuts is to set your cutting fences accurately. I use a drafting square because it's more accurate than a speed square or even a tri-square. Place the sled on the table and raise the blade to make the first cut through the sled. Then, place the square against the blade to determine the angle of the first cutting fence (on the left in this photo). The second cutting fence, of course, is simply placed parallel to the first.
Step 6:

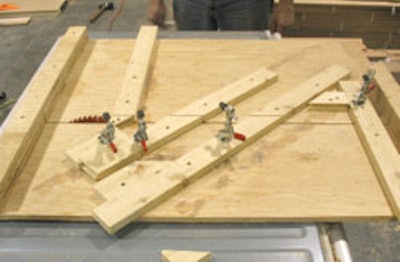
Stop blocks at the end of each cutting channel ensure pieces are cut to precisely the right length. Also note that I predrilled and countersunk the holes for the screws attaching the cutting fences and stop blocks to the sled.
Step 7a:

Attach toggle clamps at key locations along the cutting fence. Toggle clamps hold the cut board in place without putting your fingers in harm's way.
Step 7b:

The toggle clamps are not squared to the cutting area—they're slightly angled so that they pull the board toward the fence and the stop block. This ensures a more accurate cut.
Step 8:

Last but not least, clean the sled frequently between cuts. Don't allow loose pieces to collect on the sled, or they can quickly become dangerous projectiles. And, don't forget to use protective eyewear any time you're using the saw.


