


In my last post I mentioned using screws on a medallion installation. To clarify for those who are beginners: When you make a medallion you can leave some pieces ("knockouts") out-they are not glued to your plywood backer. When you install the medallion you can spread the glue, drop the medallion in place and screw through the voids to secure the medallion down. That works much better than putting weight on the medallion until the glue sets. Then you glue your knockout pieces, and you're done. Some manufacturers offer knockout pieces in their medallions. I have found screws work great, especially on large medallions.
Anyway, back to here].
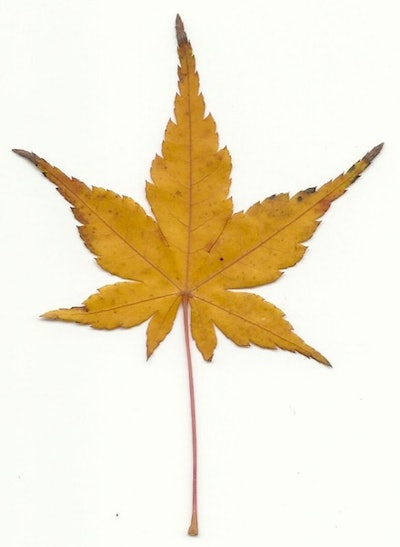
Step 1: Making the LeavesI took leaves I found on the property of the house. I copied them onto paper, sized the photocopy so that not all leaves were the same size, and saved one original copy of each leaf just in case:

Then using carbon paper, I traced the images on wood. Since the "canvas" for the inlay was rift and quartered white oak I decided to use several exotics for the leaves for contrast (in their more common names known as yellowheart, jatoba, bubinga, rosewood and padauk). Each wood had different grain and hardness. That made the process very interesting, to say the least.
So, now we have a piece of wood with a pencil drawing of a leaf (or whatever you work on). You should have your drawing reflect the petals (meaning we are not just tracing the outside of the leaf, but the inside lines as well). You should pay attention to the color and grain on your work piece. If you don't know what it will look like with finish on it, rub some alcohol on it. Stay away from heavy figure, knots and sap. Now cut it on the scroll saw. You need to cut each petal individually. If you don't and take the easy way out by cutting the whole leaf out of one piece, the grain will be in the wrong direction, like this one:

So, depending on the leaf, you may end up with five or more small pieces of wood for each leaf. I can hear you say, oh yes, okay I can do that, what's next? I can cut wood with no problem!
Slow down, dear. Understand that each time you cut a petal you lose, I repeat, you lose the thickness of the blade from the drawing on your work piece. If you just cut the pencil line and try to fit the pieces together, it will not work. By "it will not work," I mean a gap of 1/64" (.396 mm) is not good enough. Your tolerances at this level should be close to none. So, you can either cut each petal, then shape it on a little stationary belt sander, or you can double-bevel-cut the pieces. A double-bevel-cut is when you cut two pieces of wood at the same time. Your saw is angled, and when you're done, the top piece fits perfectly into the bottom one.
Anyway, now you have all the petals cut. In my last post we had a photo of a six-piece leaf. Most of the other leaves were made of seven pieces. When you cut the petals, remember to watch for grain direction. Unlike a piece of furniture, which is really close to the eye, a floor is not. So, unless the grain is really pronounced, you'll be fine even if your grain is all over the place (but if I check out your floor, I will see it-don't worry, I won't tell anyone).
Let's go back a step to cutting. A lot of the leaves have sharp points and curves. It is easier to start the cut at a point. If you finish a cut at a point on a petal you will probably not get a crisp point. You will also just tear through that point as well. Now what? Put numbers on your petals. Have a clean, organized place to store all your cut parts until you're ready for the next step. I put about 46-48 leaves into that floor I made. Originally I made about 55 leaves. That's 55 leaves multiplied by six or seven petals for each. That's 330 to 385 cut pieces. That's right, now we are getting somewhere. That somewhere is respect. Yes, I said it. Respect. Now you're wandering around with hundreds of loose unassembled mini, tiny wooden pieces. Walking around proudly looking for people to admire your obsessive, foolish creation. Guess what? No one cares, Mr. Peacock. Focus please, because you still need to cut the branches!
For the branches I chose rosewood lumber that had the grain lines and the color I wanted. I free-handed the branches. In other words, took a piece of lumber and scrolled through it, wiggling the piece a bit so that the branches had a rugged edge (note that the test piece on the bottom right-the one where the entire leaf is cut out from one piece of wood-did not make it into the final floor):

That rugged edge will make life hard when you need to fit it into the floor later. Go with the grain. If you go across it, you will have a very fragile inlay piece. It will most likely break before you are done cutting.
Okay, now we're ready for "sand-shading" so the pieces look like this:

How about we stop here and break this down to several blog posts? Great, I will post one every week until we are done with this topic. Thanks for reading, and apologies for the bad jokes. I must have been in the presence of Don Conner in past years.


