


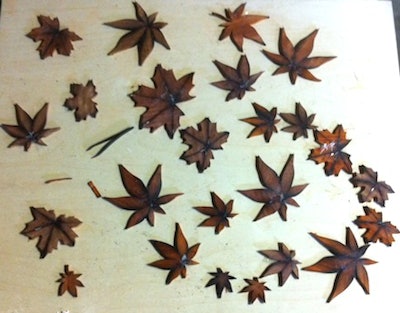
Let's continue walking through the making of the inlay. You've cut all your leaves and parts of branches. Now you're ready for sand-shading. Sand-shading is when you dip your wood parts in hot sand to darken them. Plain play sand works fine for our application. Some woodworkers buy very fine sand that gives (technically) a more consistent tone. I dedicated an old pan for my sand-shading, and any old cook top would work. You want the sand to be hot but not too hot that it burns your wood on contact. Decide how and where you want to shade the wood. Use little tongs to place the wood petals in the hot sand. Pay attention to the time it takes to shade each piece. Also pay attention to where the pieces are in the sand. Because they are so small, It is very easy to lose one. I manipulate the pile of sand in the pan with a small spoon as necessary. When done, brush off any sand from the wood and let them cool.
You will notice that your petals don't fit nicely anymore-you just shrank all your cut pieces. Don't worry about it. The gaps should disappear by the time you install the inlay in the floor. If you want to rush the moisture gain, you can rub a little water on your inlay. Once the petals are at room temperature, start gluing them together. Apply just a little yellow glue to the areas where the petals touch each other. Press them together and use clear tape to hold them tight:

Clear tape helps you see the face of the inlay at all times. If you used blue tape and the petals underneath just shifted, you wouldn't be able to see them to correct it.
Now you have a cut, sand-shaded, assembled leaf you are ready to put in your floor. (Remember that you can use this technique for any shape you cut on your saw; this blog just happens to be about leaves.) Now you need to sand and fill the floor. You want to make sure your floor is ready for the sanding sequence before you do any inlay work. Why? You will inlay the leaves so that they are proud of the floor just about 1/32" (.793mm). Then you will use a palm sander to sand them flush with the floor.
Your last step then would be to clean up the floor using a Trio or other multi-disc sander. You don't want to put a big machine and an edger on those sand-shaded pieces. You asked me how I didn't lose the shading when I sand the floors. This is how: You sand-shade them a little darker than you need. After installing them in the floor, you just remove 1/32" so your shading is still visible. One more reason you want the floor flat before inlay work is ease of working. You don't want the router catching on underwood and overwood in the floor.
Now is the tricky part: deciding where everything goes. Lay out the leaves and branches on the floor. Look at them from all different angles and traffic directions in the house. Let the owner see it and sign off on it. Take a picture of it, number the pieces and place blue tape on the floor to mark where each leaf goes:

Now you are left with a pile of leaves and branches that have numbers on them. On the floor you have a lot of small numbered pieces of blue tape. The tools you will need for the next step are pencil, marking knives, two plunge routers with inlay bits, a light, a pillow, dental tools, palm carving tools, knives, vacuum, yellow glue, glue syringe and a lot of patience:

The first pieces I inlaid were the branches:

The main center branch went in last. Why? That way you get a clean joint. Note that all the smaller sections tie into the center thicker branch. So first I put in the small ones, sanded them flush and let them dry. Then I marked my center piece, overlapping the existing inlaid branches and cut through them with the router. That way you get a perfect fit.
Marking the inlay piece on the floor: pencil or knife? Bottom line is: It does not matter as long as the installer knows where he/she needs to stop cutting. By the way, when I say pencil I mean a fine pencil, not your common construction pencil. Knife means a marking knife or X-Acto-type knife, not your dull utility knife. They make right- and left-marking knives, but let's not go there now. I like using a #2 pencil because it is easier for me to see the line than a knife mark.
The floor I made for the canvas is all random-size, random-pattern white oak. No piece is the same. The grain is going in two different directions, and all seams are tight. When I marked the leaves and branches on this floor, I sometimes went over a groove in the floor, which made the cutting a little challenging. Try to plan it out so your inlay goes into a solid surface without tongue and groove underneath.
Now you are ready to cut the cavity for the inlay. I use the biggest router bit I can to remove the majority of the wood. Then I switch to a smaller size bit, usually 1/8" (3.17mm), to get really close to the line. Finally, I use palm-carving tools and dental tools to finish the job. You can use a hand-held dental drill, a laminate trimmer, or a smaller router-whatever works for you. I like the hefty weight of my plunge Bosch router. I use two of them with different-size bits. I mark the bit size on the face of the router with a piece of blue tape. That way I can see which router I'm grabbing instead of lifting it and looking at the bit itself to determine if it is the 1/8" or the 1/6" (1.58mm) bit. Remember the pillow? I soon found that the easiest way to do this work is to lay down on my tummy. My ribs started hurting after a few hours, so that's what the pillow is for.
The basic idea of inlay work or any woodworking is: Working TO a line. You want to sneak up on a perfect fit. Your routers are great to come really close to the line. Your hand tools and your skills will do the rest.
Next week I will discuss in more detail the routing and carving out the cavity for the inlay, installing it and finishing it. Thank you for reading.


