


In my this article).
The way I see it, medallions can be a collection of one or more of the following three designs:
- Geometric shapes made of straight lines, like triangles or squares.
- Radius or curved shapes, like a starburst design.
- Organic shapes like free forms that make up a picture.
Some words and definitions you should be familiar with before you start:
- The shortest distance between two points is a straight line.
- If two straight lines meet, they form an angle.
- The sum of all angles in a triangle is 180°
- A circle is a closed curve. Each point on the curve is the same distance from the center.
- The radius of a circle is the distance between the center and any point on the circle.
- The diameter is a line segment which runs through the center point with its end points on the circumference of the circle.
- The diameter is twice the radius.
- A full circle is 360°
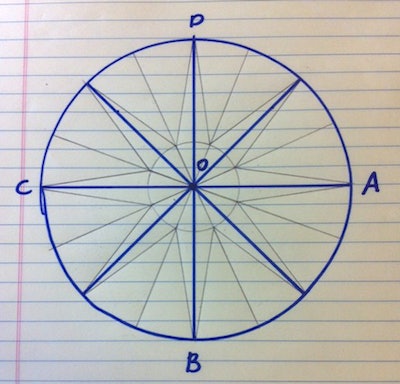
- Using trammel points or a compass, draw a circle.
- Draw axis X and axis Y (two lines perpendicular to each other running through the center of the circle)
- Find your diagonals (yes, still working with trammel points or a compass).
- Now you should have a circle with eight pie shapes. Divide each pie so you will have a total of 16 lines running through the center of the circle.
- Draw a smaller circle. Then connect the lines where they intersect to form the point. The size of the smaller circle determines the angles inside the points (triangles).

Have it approved by your customer in writing. I provide a detailed and approximate drawing. It provides my customers with all the dimensions, angles and sizes of the parts. I said approximate, because every time I draw something it ends up being slightly different in the end. If I start cutting a medallion and I realize I want the overall size to be an inch smaller, then I can do it without having to go back to my customers for additional approvals. Besides, it is only art if you change it while you are creating it. If you are interested, please practice making this drawing and/or ask questions. We will proceed on the next blog post, in which we will start cutting wood. Eventually we'll end up with this:


