In the last blog post we discussed how to draw a medallion on paper. Now you need to transfer your drawing to the plywood. The ½" (12.7 mm) plywood will serve as the backing onto which you will glue your 5/16" (7.937 mm) wood veneers. It is crucial that your full-scale drawing is precise and perfect. This is where most people start making mistakes. I didn't say almost perfect-I said perfect! The drawing is what you'll use as a reference for the rest of the process. If the drawing is off by a 1/16" (1.587 mm), you will see the mistake in the finished medallion. More so, if your drawing is off, cutting the medallion will be a hard and frustrating task. Remember that the medallion is made of identical parts in size and shape. A drawing that is not precise will throw your cuts off, and you will have to start adjusting points and angles. Not fun.
Have your woods ready to be cut. That means …
- They are acclimated to the job.
- All the woods should be the same thickness.
- Each wood should be uniform in grain and color.
- For your first medallions, try using woods that are easier to work with.
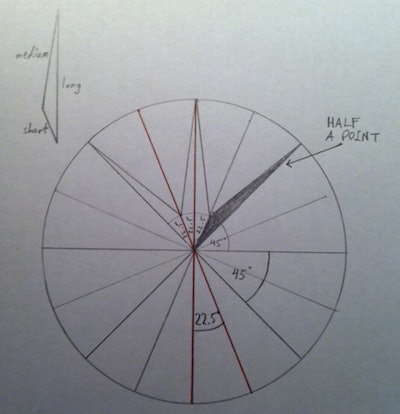
Sorry, we are not cutting medallion parts just yet. The next thing you need to do is set up your saws and jigs. For this simple design you need two saws: a miter saw and a track saw (you could also just use a table saw for all the cuts, but let's keep it simple for now, okay? Okay). The miter saw will help you cut the short-sided angles. The track saw will help with the rest. I use Masonite (it is cheap, and "cheap" is the key word when testing cuts) for my test cuts. What am I testing? My miter saw setup. We have eight points, right? Each point is made of two pieces. So we have 16 slices through the center of the circle. Remember that a circle has 360 degrees? Divide 360 by 16 and you will get 22.5. That is the angle your miter saw should produce. If you cut 16 pieces at 22.5 and put them together, they should fit tightly and add up to exactly 360 degrees without gaps, just like this:

Some guys just assemble a quarter of a circle to check their 90 degrees. Just remember that when you only assemble a quarter you have more room for error. It takes me five more minutes to assemble a full 360 to perfection. It gives me a peace of mind when I cut the medallion parts knowing that everything is dead-on.
Each point is made of two pieces. Each piece is a triangle. Each triangle has three sides: long, medium and short. You only have to make two cuts for each triangle. The long side already exists. The short side can be cut on the miter saw. The medium side can be cut with a track saw. See the drawing below:

Work from the inside out. First, cut all the points. Tape them together with clear tape (so you can see the face of the wood). I like using two contrasting woods for my points. I use yellow glue to join the two pieces that make a point. That way I need to manipulate only eight pieces (points) instead of 16. The points are the only ones that are edge-glued before assembly. Once the points are taped and glued I tape them to each other, again, with clear tape. Now it is time to cut the pieces between the points, I call them leaves.
We'll do that next time. As usual, if you have any questions, now is the time. I skip a lot of details for a reason.