


Keith Long here with Thunderheart Flooring to go through a project my wife Robin and I recently completed in Fort Collins, Colo. This double picture frame border technique is relatively straightforward. Once a person sees how much interest it can add to a project, without much additional time or expense, it can become an attractive option.
In this home, there was existing 2¼ inch #1 red oak flooring, with a custom mix stain and oil-based finish. When I was initially meeting with and asking the homeowners questions about their goals and preferences pertaining to additional hardwood flooring in their formal dining room and living room, a couple of concerns surfaced immediately. One, they were hoping to not have to resurface their existing hardwood on this level of their home, as it was in good shape, and they liked the color. Two, for the new flooring, they preferred a wider plank, if possible.
I showed them my photo album of different types of past projects completed, and they gravitated toward the pictures of the field on a 45-degree angle with a double picture frame border to finish off to the wall. They decided to go that route, with 4-inch #1 red oak in the field, and 3-inch jatoba (Brazilian cherry) and 5-inch #1 red oak for the border.

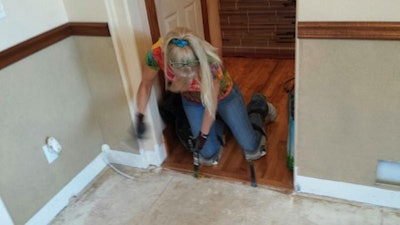
Robin was a farrier (horseshoer) when we first met 16 years ago. She’s handy in the blacksmithing forge and enjoys swinging a hammer. She’s got a real eye for detail, so when she started installing hardwood, it didn’t take long before it appeared as if she had been doing it for years. The existing header in the above picture was rounded off, so she removed it. The new design had a piece of jatoba going there in its place. When removing existing flooring, we tap the fasteners in the flooring flat right away to avoid anyone getting laid open by them:

The floor plan in this home made it a great candidate to run the field on a 45-degree angle in this formal dining room. To accomplish this, we measured out 2 feet, then 4 feet along the wall from either side of a corner in line with the direction we wanted the angle to run, then 2 feet into the field from the 2-foot marks and 4 feet in from the 4-foot marks. We took a chalk line, started in the corner, ran it through these two points, and snapped it. Not only did that give us a starting point for installation of the field, but also the rows of boards will end perfectly on the two cornerpoints along this line in relation to the border. When a person stands at the doorway, looking into this formal dining room space, the rows of boards angle toward the table and chairs, which is inviting.
Just before Robin set the first row of flooring, we laid underlayment paper in line with the ways the flooring would run. Then, we measured back from the drywall 8 inches, 3 for the jatoba and 5 for the red oak in the double border, and snapped lines on top of the underlayment paper, which we secured down with a hand tack stapler and T50 staples.

I’m cognizant of the fact that if drywall is to vary, it generally varies most in the corners, where the corner seams are mudded and taped. Knowing that this is the general trend, I avoid measuring out from the wall in the very corners; 6 or more inches out from the corners is usually more accurate. It also never hurts to sight down a wall to see if there are any major variations, and plan accordingly while measuring and snapping lines. These chalk lines, snapped around the entire perimeter of the room, are a frame of reference as to where the field will end and the border will begin.
One of the beauties of doing it this way is that not a single cut needs to be made while installing the field. A person just needs to make sure that the boards clear the chalk lines on both sides. They can run wild past, with the small amount of excess to be cut off in preparation for the border.
Robin glued and blind-nailed this first row in the tongue with 2-inch 15-gauge finish nails, with the groove side lined up with the established chalk line:

This first row does have a tendency to want to move around some while finish nailing, which can easily be rectified by tapping the boards back true to the chalk line. Here she is shown putting Titebond in the groove before installing spline:

Once the spline was tapped in place, she blind-nailed through it and ran a bead of Titebond again before gluing and installing a row of flooring the other direction. Although some of these steps may seem minor and tedious, I believe all of these small things done correctly add up, and allow a floor to be able to stand the test of time.
Once the first couple rows were set, installation of the rest of the field was straightforward. We made sure that both sides of the boards made it past the chalk lines:

… and we fastened to within 2 inches to the inside of the lines. When we got to the two points where the flooring ends in the corners, we glued the last couple rows of boards, and fastened the last row with face nails beyond the chalk lines. We were sure to place those face nails where they would not interfere with the saw blade while cutting out for the border. These nails came up with the excess material, since they were placed beyond the field, but did their job to hold the final pieces in place until the glue dried.
Once the field was in, we measured back from the drywall 8 inches again, this time on top of the wood. We snapped lines, and then verified that everything covered and looked pleasing to the eye. I don’t start or end these rows with short little pieces right next to the chalk lines. It wouldn’t be as well secured, and tends to draw the eye. Once the glue dried, we cut out for the border on the chalk lines with the Festool TS 55 track saw. The first floor I did this way was in my own home, and I didn’t have this type of saw. So, I screwed a couple aluminum straightedges the appropriate distance away to the inside of the chalk line and made my cuts with a regular circular saw. Either way, it’s best to have a sharp blade and proceed slowly to avoid chip-out.
As far as custom installation tools go, the first two things I bought were a track saw and an oscillating saw. It amazes me how versatile they are—I rarely make it through a day of installing hardwood floors without using them. Inlays, flush-mount vents, borders, etc., … once a person owns them, these tools sure come in handy!
Speaking of investment, there are tools, and there are skill sets that can be picked up. The thing that elevated my skill sets the fastest was attending courses related to hardwood flooring. In one way, I’m doing what I can through these blog posts to bring elements taught at the schools to the Internet. In another way, I believe there are certain skill sets that are best learned in person. The NWFA is hosting an Advanced Installation School the second week of September at their national headquarters in St. Louis, followed by an Advanced Sand & Finish course the following week.
I am one of four instructors to assist with the week of installation, Sept. 9–12. They’re capping the number of students that can attend, so the student-to-teacher ratio will be great for the students. Besides the skill sets to be learned, there are amazing networking opportunities available. You can get more info on the schools here.
Let’s pick up with this double picture frame border floor again next week—until then, stay sharp!


