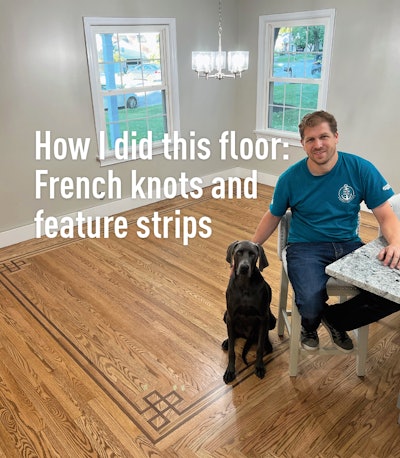
The owner of this house told me he wanted knots in his existing wood floor. When I saw the straight-laid flooring, I’ll admit I thought knots were not the best idea, but after thinking about it for a couple days, I thought, “Why not just add borders, too.” It’s in my nature to be original, so I decided to put a twist on a timeless classic and add some flare to the center pieces of the knots. My favorite part about this project is that the homeowners can tell people that these are the original floors—a true testimony to the sustainability of hardwood floors. Turn the page to see how I did this floor.
Step #1
The first thing that has to be done is to make a sample to present the idea to the client. The sample can be used to discuss placement. On this job our design called for eight French knots.

Step #2
I begin by building the starburst (diamond) pattern inside the knot. I cut scrap wood (leftover short boards) to a uniform size, then cut them into wedges using a tapering jig. The jig is a table saw sled that simply rides up against the fence rather than having guide bars. There are two different pieces cut for grain orientation. Lefts are cut face-up, and rights are cut upside-down.

Step #3
Now five left and five right wedges are glued up. A fixed base is screwed down, and all the pieces are pressed into it using cams.

Step #4
After the glue dries, I square up the piece and draw lines to remove an equal amount from each side.

Step #5
The first cut is made using a track saw.

Step #6
The second cut is made using a table saw sled set up for cutting right angles.

Step #7
The diamond is then marked up and used as a reference guide to know where all the cuts need to be made in order for the grain to line up. If there is one misscut, the entire piece is compromised and another would have to be made.

Step #8
All the pieces are cut, then marked with numbers and letters. The numbers represent placement, while the letters represent which mold the piece came from.

Step #9
The pieces are cut using the right-angle table saw sled. There is a permanent stop added and two stop inserts.

Step #10
The permanent stop gives a 3-inch piece, which is the long side of pieces 2, 5, 6 and 7.

Step #11
The first insert represents the thickness of the walnut, which is 3/4 inch. I made sure to include the thickness of the blade in this measurement.

Step #12
The second stop insert leaves me a 2 1/4-inch cut. This size is the short side of pieces 2, 5, 6 and 7, and is all four sides of 1, 3, 4 and 8.

Step #13
The walnut pieces are cut in a similar method to the diamond pieces. I set up a miter saw with a permanent stop and use five different stop inserts. Each insert represents a different cut with a picture and a number on them for easy reference.

Step #14
Now all the pieces are laid out, ready for assembly.

Step #15
The diamond pieces get routered on all four sides—this way everything can receive spline and be tied together.

Step #16
The pieces are fit together and taped so they can be placed in their location and the area can be marked off for removal.

Step #17
Here the first two are in place, with six more to go. The corner at the bottom of the picture is floating in a hallway, and the border had to be inverted so as to not go across the hallway. This way it dies into an island that still needs to be set.

Step #18
For the areas where there were existing floors, I measure where the feature strips will go and cut the floor. On the short walls, the floor is removed and the border is added running perpendicular to the existing.

Step #19
On the long walls only two boards are cut out and removed. The four boards that make up the feature strip (two walnut and two oak) add up to a width of 4 1/2 inches, which is the same width of the two rows of existing floor that is removed, 4 1/2 inches.

Step #20
Finally the four rows of feature strip can be added. Because it’s all tied together with a tongue and groove, the last row must be added using the same technique as dropping in a repair: removing the bottom of the groove and gluing it in place.

Step #21
Here, I’m close to having everything installed and the floors ready to be sanded. I started sanding with 36 on the big machine and edger to remove all the old poly. The floor had a lot of unevenness due to age of the house (1954). There were also height differences between new and old wood, so I used 36 on the Power Drive everywhere new and old met (the entire feature strip).

Step #22
After that I used 50 on the big machine, trowel-filled the whole floor, used 100 on the edger and 80 on the big machine. The final passes were 80, then 100 Mesh, on the Power Drive. The floor was stained Bona Provincial and coated with Bona Traffic HD.

SUPPLIERS:
Abrasives: 3M, Bona, Festool, Norton | Adhesive: Bona | Big machine, Buffer, Edger, Dust Collection: American Sanders | Filler: Woodwise | Finish, Stain: Bona | Finish nailer, pin nailer, compressor: Porter Cable | Floor stapler: Bostitch | Moisture meter: Delmhorst | Multi-tool, Router: Makita | Sander (multi-head): Bona | Sander (orbital), Sander (track): Festool | Saws: DeWalt | Vacuum: Ceno | Vapor retarder: Fortifiber | Wood flooring: Mullican Flooring
RELATED: How I Did This Floor: Recreating History After a Fire
See videos of this project:
Making cuts on the table saw sled:
Doing demo for the feature strip:
Installing a French knot:
This project start to finish:
A rough week
After getting the first two knots in, the island was put in place ... and seeing it all made me realize I messed up: The counter and bar chairs would be sitting right on top of the feature strip. In my mind the border should border the dining room table and not necessarily the room, so I had to tear it out and start over.