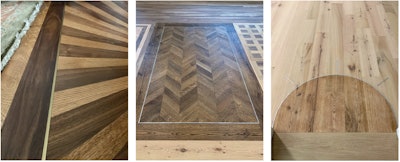
Three examples of ways we have installed metal: left, brass outlining a starburst; middle, aluminum bordering chevron; and right, on a curve in our showroom entry.
At a wood flooring school I attended, I learned how to install metal inlays, and since then they have been a great option for customers who are a little more passionate about their floors (like I am!). We installed them in our showroom floor, and we recently fixed some that were done badly by another company using the wrong material. Here are some of the things we’ve learned when we do these jobs.
I don’t offer them to every customer
When I get in front of the customer, I like to see what makes them tick without totally overwhelming them with options. Are they really excited about their floors? Do they like bling? No bling? Metal can offer a subtle coolness to a wood floor, so if people like just a little bit of bling, that metal can add just the right amount of pizzazz. I’m really passionate about wood floors, and I think that’s contagious and helps sell these jobs.
You can use them in many ways
I have outlined fireplaces with metal, picture-framing the hearth in addition to the usual framing of the hearth with wood. We’ve also used it as a transition to separate rooms or between a room and a hallway. Metal also adds a high-end touch when you use it to outline a parquet pattern of any type. In our showroom entrance, we used it to create a small sunburst (seen on the bottom right of this page).
I try to sell metal inlays as I’m selling the job so we’re prepared, but in the past I’ve definitely sold them when we were in the middle of a job and were suddenly like, “You know what would look cool?” Then we had to hold up the job while we sourced the material, and we were sanding one area but waiting to sand another area, which isn’t something I’m a fan of. Now we found a metal fabricator local to us where I bought $1,500 of this metal so we have it on hand. I like having solid brass and solid aluminum in a ¼-by-⅛-inch dimension—that gives us the ability to make the inlay either width, although generally I prefer the ¼-inch width because I think the ⅛-inch doesn’t look like much once it’s installed.
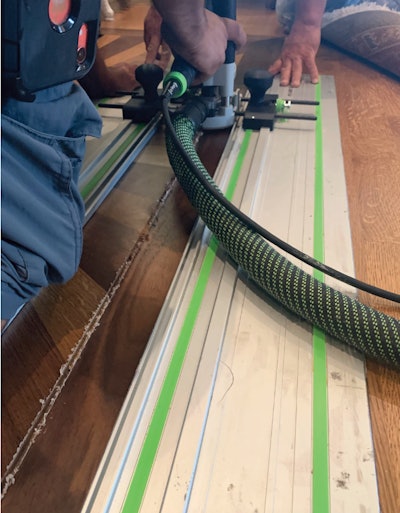
When possible, we use the router on a track to cut the dado for the metal feature strip.Options for making the dado
If we are putting the metal into a floor that’s already been installed, most of the time we use the router on a track (as seen in the photo above), just like you use a track saw. If it’s going to be bent into the floor, you need to do that with the router on a swing arm or create a template you can run the router against. Of course, you want as clean of a cut as possible, so be sure to use a good (preferably new) router bit. I do four, five or six passes to get the depth I need, because trying to cut the full ¼-inch depth in one pass could create burns in the wood that will never come out.
In a pinch—if for some reason we don’t have the router or because we don’t have enough space clearance for using the router—we have used a track saw to cut the dado. Of course, the track saw blade is not thick enough to cut it in one pass, so you have to do it twice. This makes it more difficult because you have to cut each side of the line, but it’s an acceptable method.
If we still are in the process of installing the floor and the metal inlay is going to be straight, we’ll put the flooring that’s getting the metal on our table saw to cut it before it’s installed. It’s just one straight cut, and it’s so much easier to cut that dado before the wood floor is installed. We just did a job where we were outlining a rectangle of herringbone. We used the track saw on the edges of the herringbone, and then for the wood going in as the border, we cut the dado on the table saw.
Decide how metal cuts should look
You’ve got to decide if you want log cabin cuts or miter cuts if you have places where your metal pieces meet. To cut the metal, generally we use a Dremel with a little metal cutting bit. You want it to be a clean cut, and we’ll use the Dremel to round it out a little bit. As always, measure twice and cut once!
Installing the metal
Once you’ve vacuumed out and removed all the mess in the dado, it’s time to install the metal. There’s no dry-fitting it because the opening is so tight—you’d never get the metal out again, or if you did, you’d end up chipping or cracking the wood. As long as you cut the dado correctly, your metal should fit very snug by hammering it down. Before we do that, we put clear two-part epoxy on the bottom of the dado. We use either 3M two-part epoxy or an epoxy we get from a stair company for installing metal balusters.
Sometimes we are called in to fix other people’s work: In this case, the flooring installer tried (at left) to use a Schluter strip (used for tile installations) instead of a piece of solid metal. Our “after” version is shown at right.Sanding the floor
Before we install the metal, we want the floor to be really flat, so by the time we’ve installed the metal, usually we’ve done a crosscut pass that is a 60 hard-plate on the Trio. You don’t want to spend a lot of time with a sanding machine going over the metal because that can heat up the metal and make it pop. We try our best to install the inlay flush to the floor because after you’ve cut with 60, you’re not removing much material, just getting scratches out. After it’s installed, we do our passes with 80, 100 and 120. The metal will definitely have scratch marks at that point, so then it’s time to do some hand-work. We polish the metal with steel wool and then hand-sand the wood next to the metal, making sure we’re removing any scratch marks, as well as any small pieces of metal that would react with water-base finishes. Then we coat the floor like we would any other wood floor.
As floor pros, it can be easy to get into a rut of not trying new things, because if you try something new and it doesn’t work, you can lose so much money. I encourage you to educate yourself and learn new skills that will set you apart. Ultimately, if you’re willing to take those chances and make every job as close to perfect as you can, you’ll get known for that, and people will start calling you instead of you trying to find customers.
All Things Wood Floor, created by Wood Floor Business magazine, talks to interesting wood flooring pros to share knowledge, stories and tips on everything to do with wood flooring, from installation, sanding and finishing to business management.


 When possible, we use the router on a track to cut the dado for the metal feature strip.
 Sometimes we are called in to fix other people’s work: In this case, the flooring installer tried (at left) to use a Schluter strip (used for tile installations) instead of a piece of solid metal. Our “after” version is shown at right.
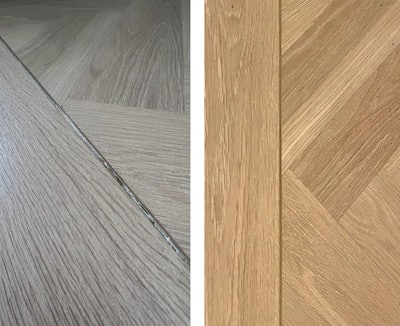 Sometimes we are called in to fix other people’s work: In this case, the flooring installer tried (at left) to use a Schluter strip (used for tile installations) instead of a piece of solid metal. Our “after” version is shown at right.


