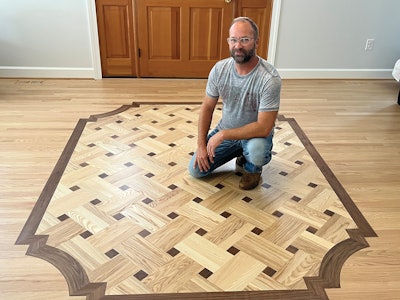
On this job, the homeowner created a design and emailed me a picture of what he wanted in his foyer. He figured I would just router out the curved corners from a large piece of wood, but I knew immediately that I wanted to bend them. Once I showed him a picture of what I meant, he realized how much better it would look with the grain wrapping around, and I got the go-ahead. As I worked on it, the other trades would take pictures of it and ask, "How in the world did you do that?!" It's a great conversation piece, and the homeowners love it. Bending wood is a pretty straightforward process; here's how I did this floor.

Step #1
After I snapped my lines, I laid the walnut and ash parquet by starting in the middle and working my way out, going over the lines a bit except in the corners. Then I cut the edges with my track saw, routed a groove and installed the 31/4-inch walnut feature strip with spline.

Step #2
With the parquet installed, I transferred all my working lines to the top of the floor so I could make sure everything was perfectly square.

Step #3
To build my bending template, I used trammel points to scribe my arcs, cut my plywood with a good jig saw, sanded it smooth to make sure there weren't any imperfections, then covered it in blue tape so the glue wouldn't stick. After covering the plywood subfloor with plastic, I screwed my template next to where we were installing. I used this same template for all four corners.

Step #4
Having a long board makes it easier to flex the pieces while bending. Although my final piece was going to be about 41/2 inches wide, to make my rips I used a walnut board about 8 inches wide and 4 feet long. I bought it as rough lumber and planed it down to a hair over 3/4 inch thick (walnut is soft, and I knew I'd be sanding off a little when I cleaned up the glue, so I erred on the side of having it a little thick). When choosing a board, you want the right grain—nothing that will stick out or catch the customer's eye. I made rips about 1/8 inch wide, numbering every cut. You want to remove as little material as possible, so you need a thin, sharp, fine-toothed blade.

Step #5
Usually when ripping a board like that on the table saw I would always go through, then flip the board and turn it around. For this, though, I had someone help me and run it straight through because I didn't want to screw up keeping my rips facing the correct way. Here you can see how each one is numbered.

Step #6
With all the numbered rips lined up in the correct order, I then used a paintbrush to spread dark wood glue so it completely covered the surface of each board—except the first one, which I didn't want to stick to the template. I used rubber gloves to keep the glue off of me, and then turned each board on its side toward the template until the entire piece was glued together. I didn't know exactly how many rips I would need to match up at the mitered corner of the 31/4-inch walnut, so I initially made this piece on the thin side, then added a couple rips to match the dimension exactly.
RELATED: How I Do These Floors: Herringbone Parquet

Step #7
To make these cams, I used a roll of tape to trace circles onto the plywood, then extended the points out. I screwed the round side down (off-center), turned the cam to push the boards tight, then added another screw to lock it in place. It's extremely helpful to have two people for this part: someone bending the rips and someone screwing the cams.

Step #8
I started in the middle of the board and worked toward each end, adding another cam every few inches. Once you get it secured, you can move and adjust cams as needed. You don't want the pieces to pop up, so I screwed these scrap pieces of flooring down across the top while it was drying.

Step #9
I was doing more than 3,000 square feet of flooring on this job, so I was able to work on this and then work in other areas while I let each curved piece dry for 24 hours. Then I used a palm sander to just graze the top of each piece to get the glue off so it would be ready for installation.

Step #10
Here you can see my pencil line that marks the dead center of each radius piece. I then used that to line up the piece with my marks in the center of my radius on the parquet.

Step #11
Here, some of the the corner pieces are dry-laid and the bent piece is sitting on top of them. The lines marking the exact center of the floor and the bent piece are lined up as I trace the curve onto the dry-laid pieces. Then I removed them and cut them with a band saw.

Step #12
This bent corner piece looks like it's installed, but it's actually dry-laid. Once all the inside parquet pieces were cut and fit, I added the outside flooring pieces, put the curved piece on top of them to mark my cut, then cut those.

Step #13
I didn't actually glue anything in place until all the inside and outside pieces were dry-fit and cut out.

Step #14
After one corner was installed, I worked my way around the parquet one corner at a time, installing the field as I went and using spline on everything except the curved pieces, which were glued. Because I was installing in the entire house, I never felt rushed working on this area, waiting for glue to dry, etc., and was able to take enough time to make sure all the measurements were perfect.

Step #15
I didn't want to get the finish on and then see a sanding mark after it dried, so I was extra careful on this sand job! I started with 80 on the big machine, then used a multi-head sander with 80, 100, 120 and 150. Then we coated with a waterborne satin finish.
SUPPLIERS:
Abrasives: 3M, Norton | Adhesive, Filler, Finish: Loba | Big machine, multi-head sander, edger: American Sanders | Nailer: Powernail | Wood flooring: Appalachian Lumber (ash, walnut), Ten Oaks LLC (red oak) | Distributor: American Products