|
|

It’s not every day that we get to stretch our legs and use more of our talents on a single job, and when it happens it makes us feel good—at least that is my closely held view. When I get surprised by circumstances on a job, I hunker down and put my shoulder to it to find solutions and overcome. I used to feel ambushed by unforeseen problems, but now I savor the experience, because I know I am going to get paid—even though I might not know the exact right answer immediately. Recently another one of those problem-solving jobs happened to me.
To tell this story, we need to start about three months ago. I was hired to refinish two bedrooms and a hallway. The clients were not a referral, and they were very thorough in checking me out online. We completed their job, and I moved on. But then I got a call about one month later asking what I thought about doing their entry, living room and dining room. I already knew their home had wood floors throughout, so I gave them an estimate based on what I had seen.
About three weeks later I was asked to move on that quote, and we started on Part 2 six weeks later, as I was busy with other contracts. At this point I must disclose that their entry and dining room had a bamboo floor over the existing oak. Remember, I previously refinished the hallway, and that hallway ended at the entry. So I had noted the bamboo floor, and that is as far as it had gone. I figured that bamboo on top of the oak was a click floating floor or a nail-down, so the demo would not be too difficult. (I bet many of you can see where this is going …)
Demo begins—and stops


First the carpeting, pad and tack strips came off of the living room floor (Photo 1), because that was the quickest thing to do.
Now to the dining room (Photo 2) —and we quickly realized the bamboo was actually glued down. Not just glued down, but glued with moisture-cure urethane adhesive we would typically use over concrete (Photo 3).
I approached the client and informed them of our discovery, and the client uttered a short retort of their displeasure regarding the bamboo installers. I made clear that this discovery was unforeseen and not expected in the quote. The client asked what it would take to deal with the glued-down bamboo. To explain, I started with the effect on the timeline … and saved the price for last. I conservatively added an extra day, and then, with a straight face, no smile and a calm demeanor, I brought the additional cost into the conversation.
The client quickly said, "We trust you. What do you want me to sign?" Since things were moving so quickly (it was still the first day, only a short time after we arrived), I had no additional work order document handy. Because I already had a history with this client, I replied back, "I trust YOU," and we commenced with the removal of the bamboo.
With all the technology in our trade (advanced 2K finishes, wonderful tools, CRM apps, texting, fabulous work vehicles, etc.), my highest respect lies within the adhesive portion, and even more so after this job! The previous installers used not one but two types of adhesive, and I surmised they had used portions of opened buckets they had on hand from previous installs. The entry had what I believe was Mannington Ultra Spread. I might be wrong on the name, but it is a teal color. Whatever the name was, it's good glue—almost cruel to remove. The living room had a brown-colored glue that I am guessing was an off brand and not sold anymore. Whatever that glue was, it was not as tenacious.
 This photo from a different job shows my worm-drive saw on a stick that saves immense time when doing demo on an old floor.
The next thing was to saw-cut the floor into smaller pieces using my worm-drive saw on a stick (Photo 4) (I've written about that in the magazine before). This portion only took about 15 minutes of saw time before it was over (that saw is such a time saver!).
Demo actually happens
 Above, the glue on the bamboo was pulling up some of the original oak boards right through the nails. Below, removing the boards going with the grain was less trauma for the original oak floor—we were able to save it this way.

 With my Dalluge framing hammer, I feel like I could move mountains. When the zombie apocalypse arrives, this is what I'm grabbing as I run out the door.
Now came the demo part. Luckily the previous installers were yahoos, because they used either a worn-out trowel or a vinyl trowel—most likely both, based on the patterns I found. Even though the membrane was thin, the bond was very good … so good that the bamboo was pulling the ½-inch oak flooring off the subfloor right through the nails (Photo 5). In effect, we were destroying the existing ½-by-1½-inch solid red oak flooring just by removing the bamboo.
It wasn't even 10 a.m. yet, and this was the scene. Using well-honed MacGyver skills, I noticed the damaging effect was lessened if force was applied along the sides of the boards rather than perpendicular to them (Photo 6). Also, I found that using my Stanley pry bars worked well to break the bond under the boards.
At this juncture we were all set with the method, and now it was time to awaken my faithful Mjölnir and commit to chaos. My Mjölnir is a 24-ounce Dalluge framing hammer (Photo 7) given to me by Mr. Dalluge himself. I set it on an 18-inch axe handle, and with its superpowers activated, I can gently convince boards to go in place or call down the thunder to move walls with ease. Few mortals can wield this hammer and remain unchanged. In case of a fire or zombie apocalypse, I'm basically running out the door with this hammer and leaving everything else to waste.
We managed to finish the bamboo demo by the end of the second day. Each hammer blow shook the house, and now the adhesive remained to fight (Photo 8a, Photo 8b).
 With bamboo demo done, we were left with two types of adhesive to remove (and many board replacements to do).

Removing tenacious glue quickly


Wielding the next arrow in my quiver, I released the Diamabrush concrete tool on my buffer to scrape the glue off (Photo 9). The Diamabrush has flaps of metal coated with diamonds to spin counter-clockwise on the buffer (Photo 10), and I find it indispensable on jobs like this or jobs with old gummy finish. (As I like to say, "No abrasive was harmed in the sanding of this floor," haha.) I use the concrete version for both concrete and wood, and I've had it for seven years now. For the edges, I used the Zec Disc on my angle grinder (Photo 11).
With glue removal done, we were prepared to begin sanding on the third day. Sanding followed a simple sequence of 60 on my big machine, followed by 80 on my Power Drive and 100 Norton Mesh on my buffer.
A note about the board replacements, then coating—finally
 We discovered these pet stains once the adhesive was removed—so another change order had to be approved to replace the flooring.

By the end of the third day, we had replaced many boards due to the aforementioned tenacity of the adhesive, a gouge left by some previous installers, and two pet stains (Photo 12) that were discovered under that living room bamboo floor (I'm guessing they were the reason the floor was just covered up, even though that's an easy fix for any decent wood floor pro).
Replacing the boards for those stains created another additional work order agreed upon by the client. The flooring underneath the bamboo was original to the house, built in the 1950s, and it was the standard flooring used in this area: ½-by-1½-inch select red oak. It's still extremely common here, and I had a supply of it on hand to easily match the existing floor perfectly. I didn't get photos of the board replacement on this job, but see the sidebar on the facing page for our usual process.
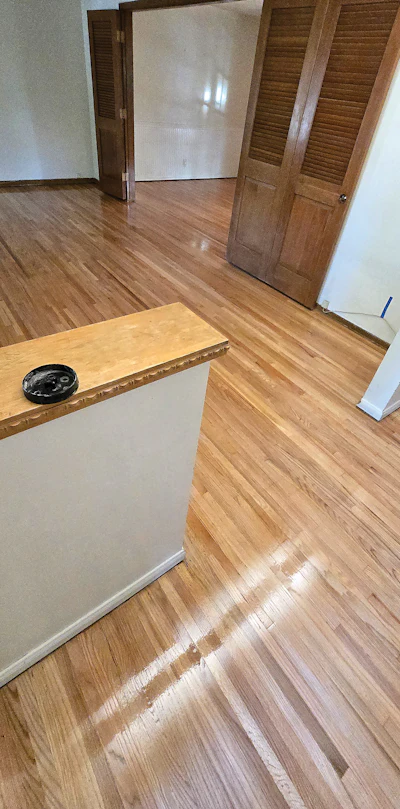
The fourth day ended with a coat of sealer on the floor (Photo 13), having triumphed over a most arduous adventure so far.
The fifth day was reserved for two coats of water-based finish, with the last coat being Bona's Traffic for enhanced durability. As a courtesy, we recoated the hallway we had previously coated with Traffic, as well.

A happy ending ... and a five-star review
The entirety of the job was small—just short of 500 square feet—but in Klingon fashion, what a mighty battle it was. We managed to save the existing oak floor from destruction by way of a careful demo process, replace boards pulled up off the subfloor, replace even more boards discovered to have been severely gouged by the previous installers and do board replacements for two pet stains.
I felt like I earned a heroic tattoo after all this!
The clients were ooing and ahing as they scrutinized the final product. The wife was pulling the husband by his arm saying “look at that” and “look at this” as small details were noticed. I swear this trade gives back in so many ways, I feel grateful—even immensely so.
The fifth day was Halloween night, and by the time I got home (about 20–25 minutes) I received an email from Google stating I received a five-star review from the clients. That is the finest reward, more valuable to me than anything. Maybe I will get that tattoo … haha.
SUPPLIERS:
Abrasives: Norton, 3M | Adhesive: Titebond III (to fix cracked boards) | Buffer: Clarke DCS | Dust containment: Clarke CAV 12 & CAV 15, DeWalt and Dust Deputy separators | Edger: Lägler Flip | Filler: Bona | Finish: Bona Intense Seal, Mega, Traffic | Nailer: Ridgid 16-ga brad gun | Sander (big machine): Clarke Classic 8 | Sander (palm): Bosch 3725 DEVS | Sander (multi-disc): Bona Power Drive | Saws: Fein Super Cut + Ridgid 7¼” worm gear | Vacuum: Clarke CAV 12 & CAV 15 | Wood flooring: Lebanon
How we do board replacements

We had two pet stains to repair on the job in the main article, but I was pressed for time and did not take any pics. We repeat the same process on every board replacement job we do, so I documented it a few weeks later.
The area in question on this job was just outside the kitchen—a manhole-sized area was beat up by moisture. It could've been a spilled Kool-Aid pitcher for all we know, but what we do know is the padding retained the moisture long enough to affect the flooring (with no airflow under the carpeting that covered the wood flooring).
The client now wanted perfection, and these cupped boards had to go. The most time-consuming part of a repair like this is what I call "opening up the hole," meaning removing the bad boards, thereby making a "hole" in the existing oak floor. If convenient, I cut out a section with the saw to remove pieces in bulk before "fine-tuning" the removal of the remaining pieces.
Then, starting from one side (tongues facing forward) we install one board at a time.
The last board is always the hardest—not really "difficult," just requiring more thought.
My method is to remove the bottom of the groove on the long side and the end of the board after the correct length is cut.
Then I insert the board and rotate it down into place. I start by putting the tongue into the groove of the next existing board and rotating the piece down so the groove side of the last replacement board is over the tongue of the preceding board recently put into place. What you don't see here is the tight fit and the careful tapping as it was "convinced" to settle down. We placed another scrap piece over the top of the groove side of the new board to support the remaining top of the groove as we tapped it down. Without this scrap support piece, the top remnant of the groove would break off completely, and we'd have to cut another board.
We didn't have many available boards, so we had to be careful, slow and methodical.
A few top nails off-center to hold the groove side down is best, and we added some Titebond III over the subfloor just to make sure it stays where it's put. When done right, the fit is tight and permanent. The goal is for this repair to be invisible after the refinish is complete.
Scratch Doctor repair kit to the rescue


My Konig Scratch Doctor repair kit comes in handy often. As I described in the main article, as we removed the glued bamboo from this dining room, we discovered the tenacious grip of the adhesive ripped out the loose parts of the grain in various places.
While we replaced boards for the major damage, in other areas we used the repair kit to mitigate the appearance of the small bits of wood removed in the existing floor, with the goal being an invisible result.
In this area, the removed portion resulted in more of a divot on the golf course than a tiny blemish. The kitchen cabinet was placed over the existing wood floor, so to remove the existing board late in the game would've been a real pickle.
The client was grateful just to have her wood floors restored as best as possible … but this big divot was exceptional for her. In this case, I decided I would fill it with water-based wood filler. As you know, it shrinks as it dries, so I had to add it several times until I had a flat, dried surface. We coated the floor at this point, and the next day, before the second and third coats, I used graining pens to color and shade the area appropriately. I drew in fake grain lines, as well.
The client stood watching as the divot was colored in, and there came a point where she said, "I can't even see it anymore. Which board is the divot?" At this point I said, "I'm done … and I'm not telling! Haha!"
If you were to get within a few inches of this repair, you'd probably be able to see the repair, but standing up full height it was truly invisible.