I got into the recoating specialty by chance. We answered a Craigslist ad (no joke) that said they were looking for someone to sand and finish a commercial space, and, before opening, clean and recoat the wood floor. That Craigslist ad wound up being a Microsoft store. In turn, we ended up traveling literally all over the country to install, sand, finish and recoat the entire chain of stores, plus going to Puerto Rico, London and Canada—we did at least 65 Microsoft stores. The stores were around 5,500 square feet of 4-inch white oak coated with waterborne urethane. Of course, we were always working at night after the stores closed, and we would have a small window of time to get a section of the floor or the entire floor done before the store opened for business again the next morning. (We learned to blue-tape the locks, because there were times we got locked in or locked out of the jobsites!)
A problem with those jobs was that behind the stores there are corridors where there are food courts, and black grease from the kitchens would get tracked on the floor, along with all the foot traffic you’d expect from customers. The floors would get dirty and hard to clean, with lots of little dents and scratches. The usual maintenance staff with their usual cleaners would just smear the dirt around on the floor instead of remove it, so any time they had a party or an event coming up, they would first call us to clean, screen and recoat the floors.
As we worked on these challenging jobs, we dialed in a recoating process that worked, even on the most demanding jobs, and it’s something that can be used for any situation, from commercial jobs like the Microsoft stores to someone’s home. Here’s my advice for a recoating process that works.
1) Try to figure out what’s on the floor.
This is an example of what can happen when you don’t do your research and testing on a floor before you recoat. We were called to look at and fix this prefinished floor that someone recoated. As you can see, you could pull it up in sheets, and it pulled up in lines (as seen in the top photo) from the floor.
Go snooping around the house or janitorial closet. Look under the sink and try to see what they use to clean the floor or (hopefully not) put a “shine” on the floor. I’ll ask if they use any type of polish/shine products, like Orange Glo polish.
There are acrylic polish test kits available, but if I don’t have one on me, I’ll scratch the floor with my finger to see if it scratches easily. If it does, that’s a sign it probably has a polish on it.
Figuring out which finish is on the floor is something you learn by experience. If it’s a low-luster floor, we know it’s an oiled floor. If we’re prepping for a recoat with another hardwax oil, we’ll try to figure out which manufacturer’s oil is on the floor and use their recommended cleaner. Of course, it can be hard to tell one oil from another, but, for example, Woca looks a little different from Rubio.
If it’s a waterborne urethane finish, it will have a clear coat and will powder up nicely with a maroon pad or 180-grit. If it’s an oil-based polyurethane, it will look amber, and you’ll smell the solvents when you buff it. Be sure to check to see how well the existing coating is bonded to the substrate by scratching it (like with the edge of a quarter) or putting a piece of tape on the floor and pulling it up in an inconspicuous area like a closet. If you scratch the floor and the coating blows up like confetti, the floor may not be a good candidate for a recoat. The coating you are applying will be only as strong as the bonds of the coatings underneath.
An aluminum oxide or ceramic prefinished floor won’t powder or scratch when you try to buff it with most abrasives. Some aluminum oxide and ceramic floors are treated with 3M Scotchgard factory-applied stain repellent or Teflon additives. These floors are not good candidates for a recoat. Site-finished coatings do not adhere well to these floors. It is important to do as much investigating as you can with the homeowners and ask if they know what brand of flooring they have. Research which manufacturers use Scotchgard and Teflon additives in their floors.
2) Do a test area.
This is a hugely important step: Always test your entire process before you do the whole floor! I use an area in a closet or somewhere else that’s not really seen to test my process of cleaning, then bonding, then applying whatever coating I’m going to put on top. Then I use a coin test to see if the finish is sticking.
In the photos at right, I’m using a cross-hatch test—scratching the flooring in a grid and using tape to see which adhesion primer worked best for this prefinished flooring. This is useful in a situation like this for flooring that hasn’t been installed, but it shouldn’t be used on a homeowner’s actual floor.
3) Moisture-test the floor.
It’s important not to forget this step! You need a baseline moisture content level of the wood floor so you know what MC you need to get back to before you coat it. Also, if there’s too much moisture in the wood floor, your adhesion promoter will not stick, and the next coat won’t stick.
Of course, it’s important to test every individual job instead of just going by what’s typical in your area. Here in central Florida, our baseline moisture content for a wood floor over a crawlspace is usually 10–11%, but in the photo at left, you can see the baseline on this job was actually 6.6%.
4) Start with a dissolver.
No matter what, we always use a dissolver first, because it’s a degreaser and will dissolve polishes and other contaminants from the floor.
I think what separates a good floor scrubbing job from a decent one is actually spraying the dissolver on the floor with a bug sprayer, then buffing it into the wood floor with a maroon pad (like we’re doing at right). Of course, edges need to be done by hand with the maroon pad (as shown below).
5) Use the floor scrubber.
After we’ve done that buffing/dissolving process, we’ll use a floor scrubber (like the Basic Coatings Dirt Dragon, Clarke Micromatic 14e, Bona Power Scrubber, etc.) that has a cleaning agent (like Basic Coatings’ Squeaky) to further break down any polishes or waxes and remove the dissolver.
If the floor had polish on it, at this point, it’s going to be disgusting—like walking around in dirty mayo on top of the floor. The floor scrubber squeegees the disgusting slurry off the floor.
After scrubbing, we always let the floor dry overnight. I’ve learned the hard way about putting finish with a bonding agent down the same day as scrubbing the floor—the finish won’t stick as well as it should.
6) Moisture-test again and apply adhesion primer.
In the photo at left, we have cleaned the floor and are ready to coat, so we’re testing to see if we’re back to our baseline moisture content we had in Step 3. We’re at 7.9% and need to be at 6.6% before coating. At right, on this job you can see the moisture content is 19.7%—it’s detecting the cleaner that fell in the gaps. If you coated over it now, the moisture could cause white lines or milkiness in the finish.
The next day, make sure your MC is back at baseline. If it is, you can proceed with applying your adhesion primer (like Loba Contact or Basic Coatings TyKote) or apply your first coat of finish that has a bonding agent (like ProCoat Bond).
The adhesion primer is kind of like a glue/thinned down water-base that will make sure the finish chemically bonds to the existing finish. It also helps with any leftover dissolver or polish that might be on the floor—it goes down so thin that it will flash off and dry before the coating has a chance to fish-eye or crawl away, so it basically encapsulates any contamination that might still be on the floor.
7) Test adhesion, moisture-test and apply a topcoat.
The next day after my adhesion primer, I check adhesion, then take moisture readings again to see if the floor is completely back to baseline. Once it is, I can apply a topcoat.
Once we started scrubbing it, you could see how incredibly dirty this gym floor was. This is just filth—no polishes.Final thoughts
If you take all the right steps, recoating can be a great part of your business, but I encourage everyone to learn from my mistakes! At this point in my career, I’m paranoid enough that I never do a recoating job without testing and testing again. If you think you have a recoating system down and you’re really confident in your system, always test anyway.
Watch the video of the floor where we were hired to fix it after the finish was coming up in sheets:
She Thought I Was A Superhero On This Job
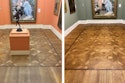
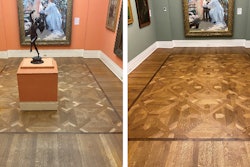
The "before" is on the left, and the floor after recoating is on the right.Many of the photos in this article are from a wedding/event venue where they had been using floor polish to maintain the shine for years—it could have been Rejuvenate Wood Floor Restorer or something similar. The polish makes the floor shiny for a short time, but dirt sticks to the polish, and for years they had been mopping this polish with dirt stuck in it with more polish, making sure the dirt was even more trapped.
For this floor, as always, first we vacuumed, then we did our first round of the rest of the process described in this article. The polish and dirt didn’t all come up after that, so we had to repeat the process.
The finish underneath all the polish and filth was 20-year-old prefinished aluminum oxide. We were able to add water-based stain to the adhesion primer finish to bring the color back and a coat of a 2K water-based finish to make the floor look new again. The woman who runs the venue thinks I’m a superhero!
Surprises While in Progress on a Recoat
This oiled floor got dirty with paint and drywall dust from the construction, as you can see in the photo below. They had tried to disguise where they had messed up the floor by putting some kind of stain on top of the hardwax oil. As we scrubbed with our maroon pad, we scrubbed that stain right off and found all the problems they were trying to hide. They also had put down blue tape on problem areas, and it left residue that we had to carefully remove during our process, as you can see in the photo at left.
Forensics for Floor Pros
Of course, some of our biggest lessons come from doing things the wrong way, and figuring out how to refine our process is like forensic science—we have to figure out what was done to the wood floor and try to correct it!
I had a job that was around 5,500 square feet, but I didn’t test it before I tried to do the entire job. I discovered that some aluminum oxide floors just don’t like to be coated at all—this one had a Scotchgard additive, but I didn’t realize that before I did the job. I followed my entire process for the entire 5,500 feet, and after I coated it with the waterborne finish, it stuck, but not well. You could peel up the finish just by scratching it with your finger. Some finishes are just so strong or shiny or smooth that the adhesion primer doesn’t want to stick.
All Things Wood Floor, created by Wood Floor Business magazine, talks to interesting wood flooring pros to share knowledge, stories and tips on everything to do with wood flooring, from installation, sanding and finishing to business management.


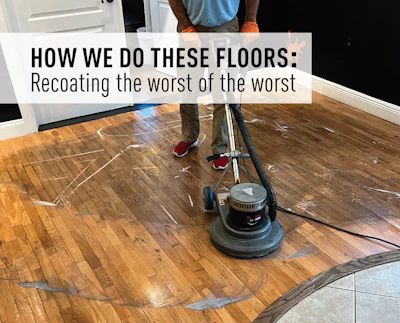
 This is an example of what can happen when you don’t do your research and testing on a floor before you recoat. We were called to look at and fix this prefinished floor that someone recoated. As you can see, you could pull it up in sheets, and it pulled up in lines (as seen in the top photo) from the floor.


 In the photo at left, we have cleaned the floor and are ready to coat, so we’re testing to see if we’re back to our baseline moisture content we had in Step 3. We’re at 7.9% and need to be at 6.6% before coating. At right, on this job you can see the moisture content is 19.7%—it’s detecting the cleaner that fell in the gaps. If you coated over it now, the moisture could cause white lines or milkiness in the finish.
 Once we started scrubbing it, you could see how incredibly dirty this gym floor was. This is just filth—no polishes.
 Once we started scrubbing it, you could see how incredibly dirty this gym floor was. This is just filth—no polishes.
 The "before" is on the left, and the floor after recoating is on the right.