Glue down wood flooring over concrete? "Are you kidding? No way! Never!" That's what many said to this suggestion years ago. And yet many adventurous individuals were willing to listen to such craziness and they glued down engineered wood flooring. Slowly, at first, and then with great fervor!
Glue down solid wood flooring? "Absolutely not! Can't be done! Stop the nonsense!" they screamed! And there from the crowd came the few, trowel in hand, who ventured forward. They had highly elasticized, cementitious products, two-component epoxies and moisture-cure urethane adhesives. The moisture-cure urethanes took the lead and the South was now able to enjoy solid wood flooring installations directly over their concrete slabs. Voila!
There were challenges, for sure. One subtlety that some did not realize was that solid boards used successfully for glue-down installation were not the same as those used for nail-down. Initially this made for some interesting installations in the field, to say the least. Typically, solid flooring used for glue-down installations is quartersawn to produce the most stable board possible.
That being said, all wood flooring is a natural product and will move with varying moisture and humidity levels, and solid wood flooring will move more than engineered because it is not stabilized by alternating directional layers. Due to this movement, solid wood should not be installed in basements since they are below-grade and highly prone to moisture and relative humidity issues.
Before the installation begins, it is important to perform a thorough job-site inspection. Ensure that the HVAC is operational and the job site is completely acclimated to the temperature and humidity at which the room will be maintained when occupied. Test the moisture levels in the substrate and ensure they are less than 3 lbs./24 hours/1,000 sq. ft. (ASTM F-1869) or 75% RH (ASTM 2170). Moisture testing is only indicative of the slab condition at the time of testing. To ensure the condition does not change, the concrete slab needs the proper moisture vapor protection underneath and proper drainage away from the building. If the moisture levels are high, consider an adhesive that performs as an adhesive, vapor barrier and sound reduction product. (But understand that these products are not designed to overcome ongoing moisture issues such as poor drainage, flooding and the like.)
Once the job site conditions stabilize, the wood may be delivered so that it may properly acclimate. Ensure the wood reaches equilibrium (for the long-term RH and temperature of the room) before it is installed to ensure minimal movement after the installation. Consult your wood flooring manufacturer for the recommended moisture content (MC) of the wood, as this will vary by area of the country, wood species and even domestic wood versus imported wood.
Now that we have the proper acclimation and a dry slab, we must look more closely at the slab. Does it have a psi of 3,000 or higher? Is it porous enough? If you drop a bead of water on the slab, is it quickly absorbed? If not, there may be a sealer that must be removed or a non-porous surface (such as burnished/steel troweled concrete) that must be ground down so the adhesive can properly "grab" the concrete. It is critical that the slab is smooth and flat (we don't want noisy hollow spots to haunt us later), and free of dust and contaminants such as drywall splatter, paint or a previously applied adhesive. Only use high-quality polymer-modified, cement-based patching and leveling compounds.
As many have found out the hard way, wood does move. Ensure you leave the proper expansion space around any stationary objects (walls, counters, etc.). Expansion spacing will vary depending on the wood species, current MC and the expected MC for the location. Contact the flooring manufacturer for its guidelines. It is important to discuss the natural movement of wood with the customer so they establish realistic expectations for the look of the floor and the necessity of maintaining the environment for optimal performance.
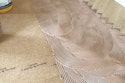
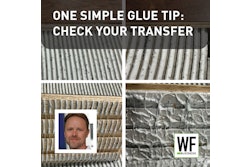
Make sure the adhesive you choose is recommended for the installation of solid wood and that you have the appropriate trowel for the specific wood flooring you are installing. The working characteristics of an adhesive will vary from job site to job site due to the type and porosity of the substrate, temperature and humidity and even the trowel size. It is best to test the adhesive in an area to see how it will behave before the job begins to ensure you do not exceed the open and working time of the adhesive. Periodically during the installation, lift a board immediately after you have placed it to make certain you have 100 percent coverage of the adhesive to the back of the flooring.
Once you have installed the wood flooring, it is critical that you immediately clean the adhesive off the surface of the flooring. Shine a light low on the floor to help find any adhesive smudges. It takes a lot of holding power to keep a solid wood floor in place, and the adhesive will bond as aggressively with the flooring surface as it bonds the wood to the subfloor! The longer the adhesive is on the surface, the more difficult it is to remove, and eventually the only way to remove it will be to sand the floor and refinish it, so remove it early and completely.
Some still say you can't glue down solid wood floors, even though they are probably standing on one without realizing it. Never say never!