I’ve been in the flooring industry for about 25 years already. I started out doing nail-down solid wood flooring, but here in Texas it’s a huge engineered market, and about 60 percent of my business is now either gluing down or nailing down engineered plank. It’s a cut-throat market with builders wanting to get everything done as soon as possible, but you still need to follow the directions. There’s a lot of science behind this engineered flooring, and if you don’t follow directions, you might have complications down the line. Giving in to that “hurry up” mentality is where everything goes south.
First (and most important), you’ve gotta have motivation! For me it’s the Metallica playlist on the DeWalt boombox to get off on the right path. Then …
1) Acclimate the flooring and discuss climate control
The engineered products I work with all require acclimation (be sure to read the directions for the products you’re working with). Here in Texas the climate tends to be extreme—extremely cold and dry in winter and extremely hot and humid in summer, so we talk with the customer about making sure they have proper AC/humidity control in the house before we commence work.
We also give them the manufacturer’s recommendations and discuss the range of what the relative humidity is supposed to be to achieve proper moisture equilibrium. We also do all our moisture measurements for the slab and the flooring and make sure we’re close to our targets before we install (being particularly careful when it’s a green slab that was recently poured). When we acclimate, we honeycomb the flooring as we stack it to make sure it’s getting air flow.
RELATED: Engineered 101: Understand the Fundamentals of Engineered Wood Flooring
2) Remember: poor subfloor prep = poor install
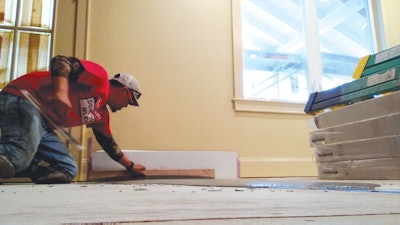
While our materials are acclimating, we’ll do our subfloor prep. I’m anal about the substrate, because if you don’t have a clean and sound substrate, you shouldn’t even be thinking about installing. If you have poor prep, you’ll have a poor install. So we’ll scrape down the slab with our Crain 18-inch red handled scrapers, and then I like to mechanically clean the floor with my buffer with a 36 (custom) pad. We’ll go over the whole floor, checking for any inconsistencies, vacuum and sweep.
Next we’ll work on any cracks in the slab. Anything bigger than ¼ inch we’ll have to chip out and refill. If there are minor cracks from 1/16 to ⅛ inch, we’ll fill those with a crack isolation membrane. Then I take my 8- or 10-foot level and run it across the slab to check for low spots, screeding opposite of the floor direction and marking hollow spots with X’s, and then come back and fill. Usually the product says that it has to dry for two hours, but I like to give it a full day. Sometimes we’ll have to come back and go over bad spots a second time after the first lift is dry or until acceptable “flatness” is achieved (I prefer ⅛, if possible).
3) Always pay attention
Prior to starting any install, we always make sure to check our knee pads and our shoes for any debris or tools. A single staple stuck in your knee pad from a prior job could ruin the entire floor if you don’t notice it scratching the surface of the flooring as you work.
As we’re racking the floor, we shuffle boards from three boxes of flooring just to make sure we’re getting a good mixture of the color and grain. With some engineered wood floors, even though they aren’t laminate, you still can have boards that look alike with repetitive patterns in the grain—maybe out of 15 boards, four will look the same or similar—so we make sure to spread them out in the floor. If we find a board that really sticks out, like a much darker color, we’ll cull that out and use it in the closet or somewhere inconspicuous (never in main entryways or other focal points).
With some engineered products you can get shorter lengths or repetitive lengths, so it’s important to pay attention to your racking and avoid things like H joints or joints too close together. The person actually stapling the floor in or setting it in adhesive has the final check on how the floor will look, watching out for weird boards or bad joints to try and achieve maximum visual appeal.
4) Find the right compressor setting (if nailing)
We aren’t always gluing over a slab—if we’re on a second story or when we’re installing a thicker engineered product, we staple it. I have a 18-gauge pneumatic stapler that’s adjustable for the thickness of the material we’re using. It’s important to set the pressure properly on your compressor. The tongues and grooves on engineered materials are finicky, not like the thick profile on a ¾-inch piece of solid oak. If you shoot your staples too hard, the flooring will start to dimple, and pressure that’s way too high can break the tongues, compromising the integrity of the floor and leading to squeaks. If the pressure isn’t quite high enough, your staples will stick out just enough that they form a little mound or bump that will be visible. Some manufacturers recommend keeping the pressure at 125 psi, but I find that’s too high, so we keep it at 90–100 psi. What’s important is to go through the trial and error with your stapler, compressor and material you’re installing to be sure it’s dialed in. Some installers are paying attention enough and have the sense to stop if they’re screwing it up, but some will keep going! Finally, always make sure you’re using a rubber mallet and good tapping block that won’t harm the edges of the flooring or mar the face of the flooring.
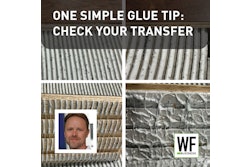
RELATED: Are You Installing Glue-Down Engineered Flooring Backwards?
5) Keep it clean
Just like a staple in your knee pads can ruin a floor, a little bit of adhesive you didn’t notice can end up all over a job site. We always keep a rag soaked in mineral spirits nearby to keep glue off our hands, our floors or anywhere else we don’t want it. And be sure to always tighten your lids (whether your glue bucket or your mineral spirits), or you’ll end up spilling them (yes, of course I’ve done it).
6) Have a good contract—and choose your clients
I just went through a long divorce with one of the builders that I worked with for several years because they would pressure us to speed-install, wanting us to work as soon as the wood was delivered without the HVAC running, etc., etc. I would tell them the problems that were going to happen, over and over, but they didn’t want to hear that … and then when things went wrong, of course they thought it was our problem. I had to make a contract with a lawyer specifically to protect our company from issues caused by their schedule or negligence. Eventually I realized that dealing with a client like that just isn’t worth it. We still use that contract on every job, and it makes it clear that we cannot be held responsible for any damage that happens after we are done with the flooring. So if, like one client we had, the RH is super low for months after the floor is done but there’s no humidification in the house and the floor we installed, along with the doors, trim and other wood there start to suffer, the client can’t try to say we’re the ones at fault.
7) Work with a good supplier
I get all of my flooring from a local distributor that has great customer service, and if there are any warranty issues with the flooring, my rep will come to the job to look at it and help make it right. It helps me sleep better at night getting materials from a reputable supplier. Sometimes we’ll get customers who buy flooring from Sam’s or Costco and ask us to install it, and I’ll do that, but I’ll be clear that if there are any warranty issues with that product, they are on their own when it comes to working with the flooring manufacturer to figure out a solution. Even real wood flooring can have repetitive grain patterns in some boards, so you have to pay attention as you’re racking and installing to make sure there’s a good mix.