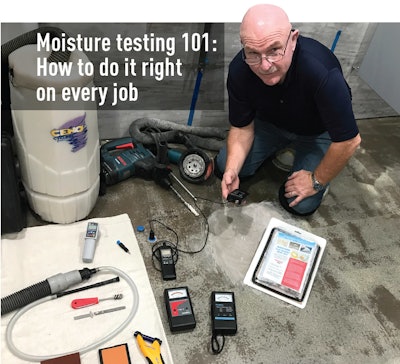
In my years as a certified wood flooring inspector, I have seen (and continue to see) lots of contractors confused about how to test wood flooring, wood subfloors and concrete moisture. There are so many contractors who don't do any moisture testing, and many who do it aren't doing the testing correctly, or they aren't doing the recommended testing. Many fail to document the information correctly. There are a lot of contractors who have been lucky when installing wood flooring without proper moisture testing, but of course the ones I normally see are the ones who aren't lucky.
Any moisture testing is only as accurate as the time it's done, the environment it's done in, and the knowledge of the person—the knowledge to do the test correctly, have the proper products or tools to perform the test, and record and document all the information. If something goes wrong, as an inspector, I want all of the testing results you can supply—with documentation. Without documentation, it's like not having done the test at all.
Job-site environmental testing
 A thermo hygrometer, which measures both temperature and relative humidity, is a simple essential tool that every wood flooring pro should be using.
One of the most basic tests every contractor should perform, before delivery and at installation, is checking the environment—temperature and humidity—of the job site. Use a thermo hygrometer to test the job site to make sure the site is at the recommended levels for the products being installed.
The industry standard for acceptable environmental conditions is 60-80 degrees Fahrenheit and RH between 30–50%. Depending on your region, those numbers could be slightly different. To protect yourself from a legal perspective (in case of a problem and resulting inspection), the most important thing is to check the recommendations from the manufacturer of the product being installed.
Your temperature and RH readings should be compared with the region's year-round temperature and humidity. One good source for finding historical temperature and humidity is Weather Underground—go to www.wunderground.com/history. This will indicate if the wood flooring should acclimate to the environment on the job site, or if you should try to adjust the environment to a more medium range—between the extremes of winter and summer—so the changes in seasons won't create dramatic changes to the wood flooring. (Realize that the directions for some engineered products require that the product NOT be acclimated—see the sidebar below.)
 I've seen so many floors that were installed at an extreme of the seasons, which can result in failures when seasons change. On the right, solid floors that were installed with a high moisture content can result in large gaps that don't disappear with seasonal changes. At left, flooring that was installed with a very low moisture content can cup when it experiences the prolonged high humidity of summer.
I have seen too many solid wood floors, installed in one extreme or the other, so they are acclimated to winter's low RH or summer's peak RH. Installing after acclimation to wintertime low RH can create summertime cupping, and installing flooring that was acclimated to summertime's high RH can create some sizeable gaps in the middle of winter—and the wider the flooring, the wider the gaps will be.
Meters for wood moisture testing
There are two types of moisture meters for testing wood (flooring and subfloors): pin meters and scan/pinless meters. First, read the instructions for your meter; I can't tell you how many contractors use their meters incorrectly.
 A pin meter during an inspection.
Pin meters are called resistance meters; this is because they measure the electrical resistance between the pins once they are pushed in the wood. There are insulated pins and non-insulated pins. Non-insulated pins read between the pins and report, via digital or analog screen, the highest value of resistance between the pins. Some of these have on-board wood species and temperature adjustments; if they don't, the manufacturer supplies a correlation chart to make corrections. The insulated pins only measure at the tips of the pins, this allows you to get gradient readings at different depths into the wood flooring and allows you to continue into the wood subflooring (if using the proper slide hammer electrode).
 A pinless meter testing a pine board subfloor from below.
Scan/pinless meters are called dielectric meters, and they measure on density and specific gravity. These meters have a two-pad system; by setting the meter on the wood with the meter in the "on" position, with light pressure on the meter, one pad sends out a signal into the wood and the second pad receives the signal to register the moisture reading. Most of these meters have a built-in wood species and temperature adjustment. These meters have different depth of penetration for readings at ¼ and ¾ inch, and some read up to 1½ inch (a depth that can measure wood subfloor materials).
RELATED: How to Accurately Measure Moisture For All Flooring Types
Engineered flooring & RH
RH isn't an issue only for solid wood. Engineered flooring products generally are better at handling higher humidity, although RH that's too high can create problems like end lift. It's the low humidity that can really do damage to engineered wood flooring: end gapping, dry cupping, delamination, and wood shear. Do your temperature and humidity testing, and talk with the customer about the wood flooring product recommendations and the ranges that they need to maintain in their home (these are also important for maintaining their warranty).
 When engineered flooring experiences long periods of low RH, it can have dry-cupping and face-splitting, among other problems.
 End lift is one problem that can result in engineered flooring exposed to prolonged high humidity.
Testing wood at the job site
With our temperature and RH measured, recorded, and within the recommended range, we can start measuring our moisture.

Wood subfloors (plywood, OSB, or solid boards): The NWFA recommends 20 test locations per 1,000 square feet; it's best to document and number each location on a drawing of the job site. You can use corresponding numbers on the subfloor and take pictures of the meter testing, and create a written log of each location tested. Once the wood subfloor material is at the correct MC, then it's time to bring in the wood flooring for acclimating (if acclimation is necessary).

Solid wood flooring: Guidelines call for 40 MC readings per 1,000 square feet of solid wood flooring.
The general rule of thumb is to ensure the difference between the MC of the wood subfloor and wood flooring is no more than 4% for solid strip (less than 3 inches), and no more than 2% for solid plank (any flooring 3 inches or wider).
Sometimes the wood flooring is within the recommended range right away. Other times, it could take days or weeks to reach the target MC. Once the wood flooring is within the recommended range, it's time to start the installation.

Engineered wood flooring: Check with the manufacturer. Some products come wrapped in plastic inside the box, and you don't want to open the plastic until you're ready to install the wood flooring. Most recommend that you need to get the product on site a couple of days before installation to get the wood flooring temperature to the lived-in job-site conditions. The process for moisture testing and documentation is the same, however: Take 20 wood subfloor readings per 1,000 square feet and 40 wood flooring readings per 1,000 square feet, and document all readings and job-site reading locations.

Acclimation is not about time
There are lots of contractors who still think if the wood has been on the job site for three days they are good to go. Years ago, directions included a specific time frame for acclimation, but that is not the recommendation anymore! Download the most recent installation instructions from the flooring manufacturer and read them before installation. Make a copy for the customer's file so if anything goes wrong, you can hand me (the inspector) the instructions as of the date of installation (along with all your documented moisture testing).
Concrete moisture testing
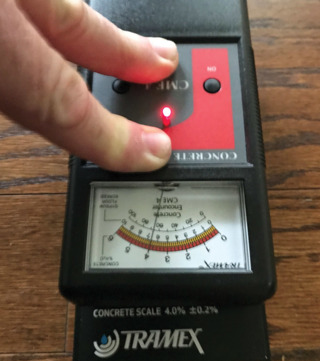
Today there are three types of concrete moisture testing recommended in the U.S. market: concrete moisture meters, the calcium chloride test, and RH testing. Let's look at how they are used.

1) Concrete moisture meters
The relevant test for these is the ASTM F2659 Electrical Moisture Meter Test.
There are two basic types of concrete moisture meter: impedance and capacitance. Some have spring-loaded contact pins that need to be depressed by pushing down on the meter to receive an accurate reading. Others have a two-pad system; just like the similar wood meters, by setting the meter on the concrete with the meter in the "on" position, with light pressure on the meter, one pad sends out a signal into the concrete and the other pad receives the signal to register the moisture reading. This style of testing shows the moisture in the top 1 inch of the concrete slab. This type of testing can be helpful in mapping the job site to locate the best areas to perform other qualitative testing, like the calcium chloride or RH test.
Follow flooring manufacturer recommendations: Some flooring manufacturers still have recommended readings for certain types of concrete moisture meters; in that case you need to use the meter that is recommended and document all of the readings. There should be eight tests for the first 1,000 square feet and five additional tests for each additional 1,000 square feet thereafter. Create a chart and mark each location and moisture reading. I recommend you take pictures of all the testing—this gives the date and generally gives the location of where the picture was taken—and keep this information in the job file.
 Check your calibration on your meter before every project.
Use the test block: When using a concrete moisture meter, get the manufacturer's moisture meter test block and check for calibration before each project.
Job-site conditions must be right: The job site should be at 60-80 degrees and 30–50% RH for 48 hours before testing, and the slab temperature should also be recorded and documented at each test location.
RELATED: What Does 'Baseline Moisture Content' Mean?
 Courtesy of Angelo DeSanto
Another concrete test: alkalinity pH testing
Testing for alkalinity is often overlooked but is of extreme importance to a successful installation. Like with moisture testing, it should be conducted on all slabs regardless of the grade or age. pH is a measurement of hydrogen ion concentration that indicates the acidity or alkalinity of a solution. ASTM F710 states that the surface of a concrete slab should be free of alkaline salts, as well as excessive carbonation or laitance (weak, milky or powdery layer of cement dust, lime and sand fines that appear on the surface of concrete).

ASTM F710 also states that a pH test shall be taken at every location and each time a moisture test is performed. The slab surface should be tested with a maximum pH reading of 9, or the wood flooring and adhesive manufacturer's recommendations. There are different styles of pH testing using both electronic pH meters and litmus paper.
The bulk of flooring manufacturers have switched their recommendations for concrete moisture testing to using either the calcium chloride test or RH test. These tests measure the moisture in different ways. The calcium chloride test measures the moisture vapor emissions from the concrete (what is evaporating out of the concrete). The RH test measures the relative humidity (moisture) within the concrete slab.
 Calcium chloride tests measure the moisture vapor emitted from a concrete slab in pounds. (Photo courtesy of Angelo DeSanto)
2) Calcium chloride test
This is the ASTM 1869 Anhydrous Calcium Chloride Test.
Use this test method to obtain a quantitative value indicating the rate of moisture vapor emission from the surface of a concrete floor and whether or not that floor is acceptable for installation of the wood floor. The moisture vapor emitted from a concrete slab is measured in pounds. This measurement is the equivalent weight of water evaporating from 1,000 square feet of concrete surface in a 24-hour period.
 Once the test has been in place for the required time, you weigh the sealed container. (Photo courtesy of Angelo DeSanto)
The moisture vapor emission rate reflects the condition of the concrete floor only at the time of the test. All concrete subfloors emit some amount of moisture in vapor form—a natural process driven by environmental conditions, and all floor coverings are susceptible to failure from excessive moisture vapor emissions.
This testing method has been around for over 60 years and has been widely used in the flooring industry. Most of the sheet vinyl and asbestos tile products recommended this test and looked for 3 lbs. or less as a standard (some recommended as high as 5 lbs.). The wood floor industry started recommending this testing method in the 1970s.
 Usually the granules in the calcium chloride test look the same after testing, and only a scale can determine any difference, but on this job the moisture was so high (between 10 and almost 13 pounds) they were semi-liquified. (Photo courtesy of Angelo DeSanto)
The testing process:
- The job site temperature and humidity should be at expected normal use for at least 48 hours before testing.
- Lightly grind an area 20" x 20"; the grinding should remove a thin layer of the finished concrete but not expose coarse aggregate. When grinding concrete, always use approved dust containment. Do not sand, dry sweep, dry scrape, drill, saw, beadblast, or mechanically chip or pulverize existing resilient flooring, backing, lining felt, or asphaltic cut-back adhesives. These products may contain either asbestos fibers or crystalline silica. Avoid creating dust—inhalation of such dust is a cancer and respiratory tract hazard.
- Wait 24 hours before setting the test kit. The kit has a clear cover, a dish with a lid which is tape-sealed and contains the Anhydrous Calcium Chloride. On the lid of the dish, there's a label with the weight of the dish including the tape and a place to record the start date and time. Remove the tape and save it to reseal the dish. Remove the lid from the dish, place the dish over the prepared area of the concrete, using the clear cover and remove the protectant layer off the sealant tape. Then cover the dish containing the calcium chloride, making sure the sealant tape is 100% in contact with the concrete. They usually supply a bright-colored warning label to protect the test area and keep someone from stepping on or kicking the cover.
- After test has been in place for 60-72 hours, remove the plastic cover. It may be best to cut the top open with a razor blade so the dish can be easily retrieved. Replace the lid on the dish and immediately reseal using the original sealing tape. Immediately reweigh the sealed container. Record the new weight, the date, and time the test was stopped. Record where the test dish will be weighed if re-weighing is not performed at the test site.
- There are a couple of options for getting the results:
1 - Generally in the test kit there is a protective bag that you can use to mail it back to the manufacturer. They will create a report for you.
2 - For quicker results, you can re-weigh the dish yourself with a gram scale and use the mathematical formula provided to get the results.
You need to do three tests for the first 1,000 square feet and one additional test for each additional 1,000 square feet.

3) Concrete Relative Humidity Test
This is the ASTM 2170 Relative Humidity Test. It's the newer technology and seems to be the direction many manufacturers are moving to.
This test method comprises two procedures for forming holes in concrete into which a RH probe is placed.
Procedure A is for hardened concrete. It involves drilling a cylindrical hole with a rotary hammer drill, then placing a hollow sleeve to line the hole.
Procedure B is a procedure for fresh concrete that involves forming a cylindrical hole by placing a hollow cylindrical tube in the formwork, then placing and consolidating concrete around the tube. The liner or tube permits measurement of RH at a specific, well-defined depth in the concrete.

Most of us in the wood flooring industry will only use procedure A, for hardened concrete. The test procedures:
- Job site temperature and humidity should be at expected normal use for at least 48 hours before testing.
- Select test locations to provide information about moisture distribution across the entire concrete floor slab, especially areas of potential high moisture. Include a test location within 3 feet of each exterior wall.
- Drill the concrete with a hammer drill and a carbide drill bit to drill holes to the required depth. Remove the dust from the hole using a vacuum cleaner; there are small attachments that you can get that will hook up to your vacuum to help clean out the holes. Avoid blowing dust from the hole that might become respirable. If necessary, wear respiratory protection to avoid breathing concrete dust while drilling and cleaning holes. Measure the depth of the holes at the bottom outside edge to make sure you are at the correct depth. Insert the hole liner to the bottom of the hole, cap off the hole and allow 24 hours before making any RH measurements.
- Remove the cap/rubber stopper at the top of the liner and insert the probe. Seal the probe lead wire to the liner where the wire emerges from the top of the liner. Connect the probe lead wire to the meter, turn on the meter and allow it to warm up as indicated by the manufacturer's instructions.
- Allow the probe to reach temperature equilibrium before measuring RH—it must be at the same temperature as the concrete before reading. Even a small difference in temperature will produce a significant error in RH measurement.
- Check for drift in your reading: The meter reading must not change more than 1% RH over 5 minutes. Equilibration may take several hours to several days depending on factors such as the initial temperature difference between probe and concrete. The meter can be turned off and disconnected from the probe while the probe equilibrates with the concrete. Record the RH to the nearest percent and temperature to the nearest degree. Also record the location of the hole within the structure and drilled hole depth. Use a RH probe to measure the ambient air temperature and RH above the slab in the vicinity of the hole. Record the RH to the nearest percent, and temperature to the nearest degree.
- Report the following information:
- Name and address of the structure.
- Date and time holes were drilled.
- Time (in hours) that probes equilibrated in holes.
- Date and time when measurements were made.
- Name, title, and affiliation of worker performing the measurements.
- Locations and depths of probe holes within the structure.
- RH in each probe hole, to the nearest percent RH.
- Temperature in each probe hole, to the nearest degree.
- Ambient air temperature, to the nearest degree and RH (to the nearest percent relative humidity) above each probe hole.
- Make, model, and last calibration date of the instrument used to make the measurements.
- Any observations that might affect the interpretation of individual measurements, such as standing water on the slab, wet coring operations, weather, or ventilating system operations.
Most common moisture testing mistakes
These are the most common mistakes I see when moisture testing:
- No tests performed!
- HVAC not operational at the job site. The job site is not at "normal living conditions."
- Not acclimating meters. They must be acclimated to the job site environment before testing.
- Not using pressure on the meter. Some meters need slight pressure applied or firm pressure to depress the spring loaded contact pins in order to get accurate readings. I frequently get pictures of testing being performed with no hand pressure applied to the meters.
- Not calibrating. I see 5- to 10-year-old meters that contractors use that have never been checked for calibration or checked on a test block.
- Not using the correct time frame. Some of the testing takes 24 to 72 hours to get the correct readings. Without the recommended time, you can't be assured of an accurate measurement.
- Insufficient number of tests performed.
- No documentation of testing.
- Incorrect preparation of the concrete for the calcium chloride test.
RELATED: Understand the Science of Water and Wood Floors
What we did back in the day
Back when I got started back in the 1970s, the main moisture testing we would do what was called a poly-film test. We would tape down a 2-by-2-foot square of 6-mil plastic for a couple of days, come back and remove the plastic and see if there were water droplets on the plastic or if the concrete had darkened in color under the plastic. Generally, we would do 1 test for every 200 square feet. In those days that was the go/no go test.
Phenolphthalein was another test that some of the prefinished manufacturers used to recommend. They recommended chipping out a small section of concrete, then applying 3% phenolphthalein in alcohol solution in the chipped area. A red color would indicate moisture being present. The concern was that you could get anything from pink to bright red using this test—there's always some moisture present in concrete. We would do one test for about every 200 square feet. This test was not widely used.
A final word: Please follow the directions
With the old standby calcium chloride test and the newer RH test taking the main stage for now for slab subfloors, please follow the directions on how to perform these tests correctly. I recommend you buy the ASTM testing standards for the testing you are performing, read them and make sure to follow all the instructions. Take any moisture testing class, seminar or manufacturer training that you can find.
 Remember: Calibrate your meters frequently; I get mine factory-calibrated once a year.
Those of us who are certified wood flooring inspectors need to have our moisture meters factory-calibrated every year. When I end up in court, the first question I get asked by an attorney is to please show my certificate from the manufacturer showing the last time my meter was factory-calibrated. If I don't have that, my professionalism is in question, along with all of the moisture reading in my report. Likewise, if you aren't calibrating your meters you use on the job, your results could be off and the success of your jobs could be threatened.
RELATED: Wood Floor Cupping: Why Does it Happen & What Can You Do?
Take a quick quiz on moisture testing to test the knowledge from this article: