Hello, Keith Long here with Thunderheart Flooring.
While growing up, my family was in the livestock industry. By the time I graduated from high school, we had sent over 1 million animals to market. At the peak of our interests, we had 54 employees. In talking with kids at school, many of them said they wished they had lots of land and raised animals. Although it gave my family a chance to produce something people demand and build a profitable business, from an early age I remember liking construction better than raising livestock.
Growing up, our time and attention was focused on our core business, so we subbed out our home maintenance needs to building contractors. I can remember crawling up on the roof in my early teens when a roofing contractor was working on our home and getting in the mix with him. He taught me a few things about the finer points of roofing and let me work with him on things I could handle.
My love of construction has never waned. I like the fact that there is a beginning, a middle, and an end to construction projects. Livestock has its good points, too, don’t get me wrong. However, one of the things about it that’s less appealing to me is the constant attention it takes. Thanksgiving, Christmas, New Year’s, blizzards, drought, floods, et cetera, livestock still have needs—they don’t quit eating or needing attention, even when a person would rather take a rest, doesn’t feel well, gets injured, et cetera.
When I first started practicing the craft of hardwood flooring, I worked for another company for a period of time before getting out on my own. I have plenty of memories from those days; many of them good, some less than ideal. One thing I remember about that experience is hearing a statement being thrown around pretty often: “This milling’s terrible!”
Although it was a more lengthy process than I care to admit, through the years I have become more and more focused on subfloor preparation. The more meticulous I am with making sure the substrate is clean and flat, the better the milling of the wood seems to be.
Here’s what I do pertaining to subfloor preparation:
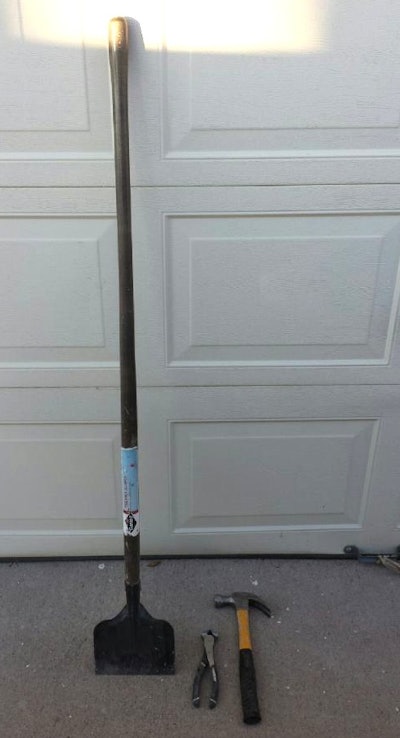
At right is an ice scraper, found at most any hardware store. I go over every square inch of the subfloor with this tool, even if it looks clean. It never ceases to amaze me how many anomalies there can be sticking up that could throw off the level of a wood floor. Most of them scrape off and can be swept up into a dustpan. Raised up framing nails can be set with a hammer, while anything else that could benefit from coming up can be removed with a pair of dykes.
Next, I walk around and listen for squeaks and feel for any part of the substrate that has movement in it. I’ve used both framing nails and screws to firm up problem areas—do any of you out there prefer one of these fasteners over the other, and if so, do you have reasons why?
It took me 25 minutes and five 36-grit edger discs to edge all the seams and the perimeter of this room. I edged the perimeter also because this room got a double picture-frame border of 3-inch select walnut and 5-inch No. 2 white oak. This portion was glued in, and the adhesive bonds much better to freshly scarified subfloor than it does to subfloor covered with dust and paint. By my way of thinking, it’s such a small investment of time and materials for the return that I’m willing to do it. The return is the saved time not having to fight the installation and sanding processes because everything went in like a roller coaster ride while following the undulations of the unprepared substrate.
Muttering “Stupid mill…” dozens of times during installation while the tongue and groove isn’t lining up isn’t high on my list of priorities. Grinding on a floor that’s not flat because it’s rolled over unset framing nails and humped up on unsanded subfloor seams isn’t anywhere on my priorities list. As hardwood flooring contractors, it behooves us to set the floor up for success.
The way I see it, there is a choice when it comes to subfloor preparation:
Choice One: Be given a square peg and a round hole, with a goal of fitting the peg through the hole. Pull out a big hammer (and lots of time and sandpaper and choice words) and beat on the square peg until eventually, splintered and somewhat resembling what it used to be, it makes it through the round hole. That's what installing a wood floor over an unsanded header like the one above is like.
Choice Two: Be given a square peg and a round hole, with a goal of fitting the peg through the hole. Take a small amount of time and attention to make the round hole square. The square peg passes through the square hole like a hot knife through butter, and it still looks like a square peg after doing so. (That's a sanded header above.) Drop by the doctor’s office and inform them you don’t think you’ll be needing that prescription for high blood pressure anymore. With the savings, you swing by the flower shop and buy your significant other a beautiful bouquet. You head home and don’t feel like kicking the dog. At the end of the day, you rest in peaceful sleep, grateful that you have square pegs to work with.
Those who mill flooring have incredible amounts of thought, infrastructure, money, and time wrapped up to get their products to market. Their electric bills might give the average person some serious heartburn. Plant maintenance … keeping employees safe and cared for … cutting or buying logs … insects … making sure moisture content is correct, both before rough cutting and milling … kilns … grading … sorting for width … finding markets for their product … shipping to and from the plant—these folks have plenty on their plates.
If the milling is truly off, anyone can put calipers to the wood and confirm it. If it happens on a consistent basis, well, we can vote with our feet and go somewhere else with our flooring budget dollars. However, to unnecessarily throw a mill under the bus because we as flooring technicians are unwilling to properly prepare the substrate seems shortsighted. For the small investment of time and materials it takes to set myself up for success as far as the substrate goes, I give it the attention it deserves.
I want to give homeowners the best possible end product. Is it important to start with a reputable mill with consistent moisture content, correct grading, and accurate milling? I say yes. Is it important to properly prepare the substrate? I say absolutely.
Let’s go through the install, sand, stain, finish portion of this job on the next post. I’ll show you how the homeowners got a custom installation in this room and saved money at the same time. I intend for the post after that to be about business.
Stay sharp!