Hello, Keith Long here to go through the install, sand, and finish portions of a job recently completed in my hometown of Greeley, Colo.
Legacy Property Inspections has done a wonderful job inspecting property to be purchased by my clients. I gladly refer them if someone I know has a property inspection need. I was pleased to be referred by Don Richards, owner at Legacy, when during an inspection a couple asked if he knew of a good hardwood flooring contractor. The job we’ll go through in this post was done for these folks.
I carry along an album of printed out photos of jobs I have completed pretty well everywhere I go. I wear out two of these albums per year showing my handiwork. When I was first out on my own and was banging the drum and letting everyone know what I did, no one was exempt. I can remember waiting to check out in the grocery store line, with someone ahead of me, and several others behind. I turned around, and asked the woman behind me, “Do you want to see something cool?”, as I offered her my photo album.
“Well, yeah,” she replied, “Who wouldn’t?” She said she liked what she saw, took a card, had me over for an estimate, and hired me to do her floor. As I have gained a clientele of satisfied customers, referrals come in more frequently. It’s nice when people have either seen my company’s work somewhere, or have been told by someone they know and trust that I’m a craftsman.
Not only do the pictures help to build confidence and rapport with prospective clients, it also gives them something to do other than stand there while I measure.
When I arrived at this home, I had my photo album along with my estimating clipboard. Not only do the pictures help to build confidence and rapport with prospective clients, it also gives them something to do other than stand there while I measure. About half the time on estimates, after seeing these photos of completed past projects, I hear something along the lines of:
“Well, you’re certainly qualified to do this job!”
“That settles it, you’re definitely my guy. What’s your availability?”
“Honey, this is the one. We don’t need to call anyone else.”
I am constantly attempting to give clients the best value possible. These folks mentioned they wanted it all to flow, so they asked about lacing into the existing flooring. When I saw all of this hardwood, and they only wanted to add in the living room, I asked these homeowners if they liked the color of what was already there. They did. It wasn’t in bad shape, so I gave them a couple options:
1. Lace into the existing hardwood, sand, stain, and finish everything.
2. Do a double picture-frame border in the living room, sand, stain to match, and do the base coat of finish in that room, then buff and final coat the existing floor with the new floor.
It turned out getting the custom floor in the living room was more interesting, and they felt it would still flow if the new boards ran in line with the existing. It would cost the homeowners less money overall, since the floor that was already in would only need a buff and coat, not a full resurfacing.
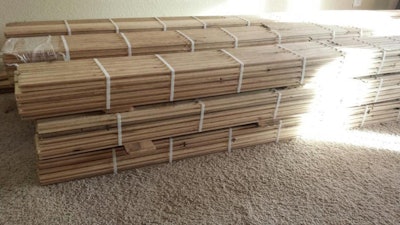
The wood already in the home was 3¼ inch #2 white oak. I had that exact species, grade, and width in stock in my warehouse, so once we were contracted, I set the bundles to acclimate in the home. Since the vast majority of the time I’m stocking my own flooring, I prefer to open a bundle or two and use some of the pieces as sticker material. I believe keeping the wood more spread out this way facilitates the acclimation process.
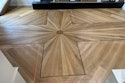
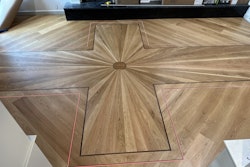
To make it all flow, I snapped for this starter row close to the center of the floor, in line with the rows of existing flooring. When clients talk, I have discovered it’s best to listen. These folks informed me they had plans to have built-in cabinetry made and installed on either side of their brick fireplace. These cabinets would be 18 inches deep, and they were hoping that the border around the perimeter wouldn’t dive underneath where this cabinetry was set to go. So, Robin and I measured the appropriate distance out from these points when determining where the border should go:
The finer points of installing a room with a double picture-frame border have already been discussed in my posts Installing A Double Picture Frame Border, Part 1 and Part 2. However, since on this floor the rows are running straight, there are a couple of things that differ:
For the last row on either side in the field, I prefer to glue with both Titebond on the tongue, and subfloor and construction adhesive on the subfloor, only for the portion of the boards that will not be cut off. I fasten with face nails beyond where the border will be cut off. Then, after the glue has dried, I cut out the border, and can use the groove router and spline to keep everything tongue and groove.
I treat corners such as the ones on this brick fireplace as if they are butt joints in flooring. Notice how I used longer material as I got near where the border would be cut out, so that a butt joint didn’t end up too close to where the border would start.
Ahhh… White oak and black walnut—as Forrest Gump would say, “Just like peas and carrots.” We installed a piece of walnut on either side after the 5-inch white oak portion of the border, so that once the cabinets are installed, those parts will match how the border interfaces with the existing flooring.
I did several stain samples to discern which pigments would be the right mixture to be the closest match to the existing flooring. I did them under where the built-ins would go, then sanded them all off after determining that one part Golden Pecan, one part Early American, and one part Nutmeg was what would be used. Since the existing hardwood has been in since 2006, and was coated with polyurethane back then, it had a bit more of an amber tone than what was just added. So, I did the second coat with a single component emulsion-type waterbased finish:
This got the two floors looking great from a color match standpoint. Notice I’m wearing nitrile gloves and a dual canister respirator. I make it a point to protect my skin and lungs. Also, you can see the hardware I’m using to apply finish on this particular job. I’ve rolled, used a block, a lambswool, and a T-bar and applicator pad at different times for different finishes and job layouts. For stain, I rag on/rag off quite a bit, but have also buffed stain in from time to time. Are there any opinions as to what you all prefer to apply stain and finish with?
After a thorough buffing and cleaning, I applied a coat of two-component water-based finish over all the hardwood:
I’m having a great time meeting people’s hardwood flooring needs. The husband of the couple that bought this home shook my hand at the end of the project and said, “You done good, you done real good.” The wife was super, and full of compliments. Seeing how pleased people are at the end of projects brings me satisfaction.
There was discussion while at this home about converting the staircase and some of the upper level from carpet to hardwood in the future. In anticipation of this, I mixed enough of the custom stain color up front, and now have it on a shelf in my warehouse with their names, address, phone number, and the mixture ratio on it. The color will be an exact match should they call and have me back for more improvements.
I recently had an inquiry from a fellow contractor about how I got started in real estate investment, as he is looking into pursuing that path, too. I intend for the next post to be about some of the specifics of my journey to financial freedom, with investment properties as the main vehicle to get there.
Stay sharp!