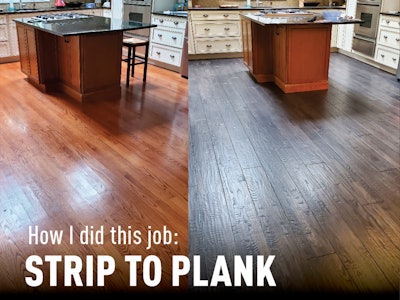
This project was estimated as a regular refinish, plus the installation of approximately 200 feet of new oak flooring after tile removal—a total of approximately 950 square feet of red oak strip. At the end of the first week of work, with the tiles removed, the new flooring installed and the rough cut done with the big machine, the client saw a sample board I had for a meeting with another client that afternoon. The client loved the idea from first sight.

The 2-by-5-foot sample panel had nine rows of 2¼-inch red oak strip. They were all stained with the same color, but I had it regrooved every third line and added a few random butt joints going across three rows. The sample included three finishing techniques: The first row was regrooved and sanded flat, the second row was regrooved with hand-scraped bevels and sanded flat, and the third row was regrooved with full hand-scraping on the bevels and the surface.
My client, Roy, couldn't believe the sample was the same flooring as his own but looked like a wide-plank flooring. I explained every step of the process, and he was shocked. He asked if I could leave the sample over the weekend. I called my other client to ask if it was possible to present the sample on Monday and, luckily, got a green light to reschedule.
When I showed up on Monday morning to continue the work, Roy decided to change the work order and go with regrooving and full hand-scraping.

Step #1
We started with setting up the router with a 45-angle grooving bit and a router track. We ran the router on a track parallel to the flooring layout, creating a groove every third row.

Step #2
Three rooms included a border with Brazilian cherry feature strips, and we had to regroove them, as well.

Step #3
In the meantime, one of my crew members started creating butt joints with a compact router and a carpenter's square. The butt joints were marked randomly to imitate a true installation look of a wide-plank flooring.

Step #4
While my employee continued to regroove, another crew member started to hand-scrape the bevels…
RELATED: How I Do These Floors: Herringbone Parquet

Step #5
… and I jumped on a heavy scraper to hit the surface and give it a unique look.

Step #6
After four days of three of us routing and heavy-scraping, we could move forward with the finishing steps. We abraded the floor with a maroon pad and water-popped the surface. The next day we applied an oil-modified stain.

Step #7
Once the stain was fully dry, we finished the floor with a coat of waterborne sealer and two coats of two-component waterborne flooring finish.

Completion
During the final walk-through, Roy and his wife were amazed and couldn't have been more happy. They couldn't believe this was the same strip flooring they lived on for so many years. Even their neighbor, after seeing the floor, thought it was newly installed prefinished flooring and asked where he could buy this product. What had been a regular refinish project with a little bit of new strip flooring installed turned out to be a one-of-a-kind, state-of-the-art flooring transformation.

SUPPLIERS: Abrasives: Norton Red Heat | Adhesives: Wakol MS262 | Buffer: American Sanders RS-16DC | Dust containment: Festool CT36, CT48 | Edger: American Sanders Super 7R, Lägler Flip | Filler: Woodwise | Sealer, Finish: Loba Easy Prime, Loba 2k Supra | Moisture barrier: Wakol PU280 | Moisture meter: Lignomat Ligno-scanner D | Nailer: Powernail | Router: Festool 1400, DeWalt Cordless Compact | Big machine: Lägler Hummel | Palm sander: Festool RO125 and ETS | Multi-disc sander: Lägler Trio | Saws: DeWalt | Scrapers: Hardwood Industry Products | Stain: Bona DriFast (custom mix) | Wood Flooring: Smith Flooring Inc.
RELATED: How I Did This Floor: French Knots and Feature Strips