|
|

I got into sports flooring because my now-husband Steve’s family had a business. We started dating in high school and his family was like, “Oh, she can paint!” so I started painting and I thought, “Great, a summer job.” I worked there and went to college to earn my art degree. And after four years of college, I had a pretty good reputation for doing graphics and gym logos. It just became a career. It’s interesting as an artist to do gym floors because—I don’t know if other artists are like this—but you work a typical art project and you work it and work it and work it, and then, sometimes, you over-work it. But with a gym, you have to be done. You have to stop and walk away. And a lot of people were seeing my work, but it took until I was in college for one of my professors to say, “Hey, that’s kind of cool, and a lot of people see your artwork, whereas some of your fellow students here won’t have that experience.” As the owner of the company now, there’s a lot more that goes into creating a modern gym floor than there was back then, but it’s still very much an art. Here’s what goes into one of our gym floor projects.
1) Designing
When it comes to the logos, I do most of the computer designing and my son, Michael, does the application. Some gym floor contractors hire someone outside the company to do their design work, but we do it in-house. For schools, typically we’re working with an athletic director, principal or superintendent, or in grade school it might be a P.E. teacher. I’ll recommend colors. A lot of people like white, which looks great on college floors when they’re re-coating every year, but high schools aren’t on that schedule. Typically they’re supposed to refinish their floors every 10 years, but they push to sometimes every 15–20 years.
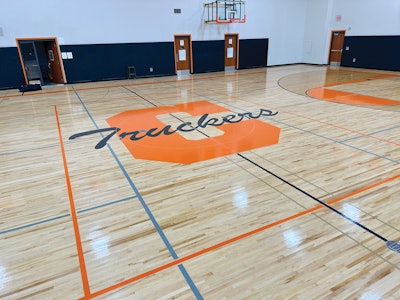
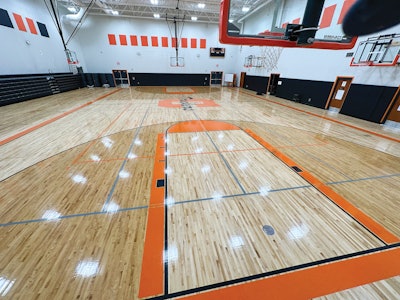
When it comes to graphics today, of course, they want it all. The middle and elementary schools want graphics, whereas years ago we never put graphics in elementary schools, because of costs. But now they all think they have to have college courts. Our schools are getting so used to that high-end product, and they’re paying for it. When I started, if you put a “C” in the middle of the court, you were lucky—that was the big time.
I’m going to show you our process on this project at Clintonville Middle School, in Central Wisconsin, from start to finish.
2) Checking the concrete for flatness

The first thing we do when we get to the job site is check the concrete floor for flatness. We use a straightedge like the one pictured here and lay it flat. We’re looking for plus or minus 1/8 inch in 10 feet, and lay the straightedge in both directions of the gym. We mark the high areas and the low areas so that they can be fixed. We mark them with spray paint so the GC can’t just wipe them away—he’s got to deal with them. What a lot of people don’t know is that after we check the concrete, the concrete now belongs to us. So we make sure it’s the best it can possibly be.
3) Moisture testing

Next we do a slab RH test, where we drill into the concrete and we set a sensor. We’re looking for the RH in the concrete to be below 85%. On this job we tested in six spots, and they read: 88, 85, 59 and 85. Well, the “88” cancels out all the other readings, as it’s a one-fail, all-fail type of testing. Six years ago, GCs used to fight you on it. We find that today they understand it. So, because this particular slab did not read below 85%, we installed a moisture barrier for up to 99% RH in concrete (seen in step 6).
4) Unloading

Before the wood comes in, we take the MC of the wood. If it were too high, we would reject the flooring and send it back, but we’ve never had to do that. We have rejected a truck because it came un-tarped, however—we didn’t even look at the wood. The driver said, “It’s only been driven, like, two hours!” And we were like, “Nope, not acceptable,” and the trucking company had to pay for the rejected wood. We typically rent a forklift to transport the wood from the trucks into the site, but in this case the GC had one at the job site.
5) Checking we got everything

Here, we’re checking the bill of lading to make sure that we got what we ordered. For this project, we bought all our products from the same manufacturer, so it’s one full system. The flooring material for this project was all made in Wisconsin.
6) Laying out the moisture barrier


Because this subfloor’s RH tested above 85% in one spot, we installed a moisture barrier before we began laying the subfloor. We seal all the barrier’s joints with a special tape so the moisture can’t get through. Sealing is the No. 1 thing we see that a lot of other companies don’t do, mainly because that tape’s pretty expensive—about $75 a roll.
7) Shock absorption

Typically we have two teams, one for installations and one for painting and coating. Installers know that one of the most important parts of gym floors today isn’t seen: the shock absorption system. Gym floors all have some kind of shock absorbency, and the technology is getting better and better as to how to keep our athletes safe. A middle school court like this can affect students for the rest of their lives if their knees or ankles are injured on this court. Underneath our pine subfloor system are shock-absorbing hex resilient pads.
8) Installing the first layer of the subfloor system

A lot of companies use plywood subfloors, but when plywood gets wet, it’s hard to dry out. So we use an intersecting, solid wood subfloor, and you can get airflow underneath it. If it gets water damaged, a lot of times, with the proper techniques, you can get it to go back down and not need to repair it. Here we’re laying the bottom boards, which have the VERT pads for shock absorption stapled on the bottom (read more about the VERT pads in the sidebar on page 44).
RELATED: How They Do It: Pulling Off Today’s Bold Basketball Floors
9) Installing the second layer of the subfloor system


As the bottom layer comes together, we begin installing the top layer across. The biggest challenge is getting the correct angle and spacing of the bottom layer and top layer. The bottom layer boards are spaced 6 inches apart, and the top layer is spaced 2 inches apart. The butt ends of the boards are stapled the recommended three times in the middle of the bottom layer.
We usually have a two- to four-person crew, and an 8,000-foot subfloor like this takes us two and a half days to lay. So the subfloor is a little more technical to install than most, but 50 years later the client is going to be happy we took the extra day and a half to do it.
10) Still checking moisture

For this area in Central Wisconsin, 7.5 is a great MC. Each geographical area within the state has its own target moisture levels. On a job site, every day and sometimes twice a day, depending on what the moisture is doing, we check the MC, and we do about 30 spots a day. If the maple is at 8.5%, we actually want the wood to dry out a little. You don’t test just the same pallet, and you don’t test just the same bundles, because the outside of the bundle in a pallet can be one MC and inside can be another.
11) The remote data logger

We purchase and install a remote data logger for each job; it tells us our temperature and the RH on the site and logs the data. Between 35–50% RH is our target. If it gets below 30%, we bring in humidification. On this job, we were getting close to needing the GC to bring moisture into the gym. Our guys keep an eye on this, and that’s why you need good quality employees to do this kind of work. The remote data logger also helps the school know the RH and temperature after the floor is completed.
12) Racking out the maple


When about 60% of the subfloor is uniform, stapled and in place, we start racking out the maple. We inspect each piece while racking it. Racking out the maple helps equalize the moisture in the wood. In the state of Wisconsin, a gym floor’s MC might go as low as 4% during the winter and as high as 11% during the summer. As you can see in the second photo, every 11 rows or so we stick a board upright to let the crews know where to put expansion rows, a process known as “intermediate expansion.” These are the rows where we leave room for the wood to swell with seasonal change in RH by putting a line of weedwacker line in between the boards. That line comes in different thicknesses, and we have calculated which thickness we need and how often we need it in the floor.
13) Installing the maple flooring

Here, our guys are nailing the floor down. About 90% of the time we start in the center of the floor and nail both directions toward the wall. This is more people than we would normally have on a job, but it was a close-to-home project, so everybody wanted to work on it, and we also had a strict timeframe for getting it done.
14) Chalking high and low boards after installation


After the maple is installed, we mark the high boards on the floor with chalk. Because our crew gets to draw and color on the floor, we call this “therapeutic time!” When we sand with the big machines, we make sure to get all the high boards sanded out.
15) Sanding with dual riders

For a brand new floor, we start sanding with our dual rider sanders with 30-grit at a 40-degree angle, and then we do 40-grit, 60-grit and 100-grit sanded with the grain straight. That’s what we’ve found to be the best. Other people do other methods; some start at 40. Sometimes you get grit from the surrounding construction work and people walking around, so keeping the floor clean is always a priority.
You get a little more work done using the dual sanders, and there’s less pounding on your joints and body. We wouldn’t necessarily say it’s easier on your body, but it is easier on your joints. This business isn’t for the weak-bodied or weak-minded. As I always tell people, flooring people are a special breed.
16) Edging the floor

Edging is still one of the toughest jobs in the business today, because as you’re bent over you’re also trying to control a 50-pound machine. We have some of our more skilled people do this part of the job. For the edger, we usually start at 40-grit, then 60 then 100.
Speaking of the edges, you can see we have an expansion gap of about 1¾-2 inches along the wall. And you can see that our vapor barrier goes all the way to the wall and up the wall, and that’s very important. A lot of people stop their vapor barriers before the walls and have big issues. The barrier gets covered when you install the base line, which is the very last thing.
17) Measuring

After the floor is sanded, we use a laser to measure off of the goals before we start putting the game lines down. We hope the person who installed the basketball goals is on the same page as we are, but probably 80% of the time, the goal is not installed correctly. It’s hard to install them perfectly, so we always use the term, “Make everything look square, then be square” in a gym. The installers putting in the goals are measuring from the ceiling, and we’re measuring from the floor, so it’s almost impossible for the goals to be spot-on perfect.
RELATED: What I Learned Going From Residential to Gym Work
18) Using the taper to make game lines


When we’ve marked our pivot point after measuring off of the goal, we use a device called the taper, which runs two rolls of tape at the same time. We hook it up to that pivot point arm seen above and work off of that to start forming the arcs and our game lines where we plan to apply stain.
19) Water-popping before staining

We water-pop the areas that will have stain. Maple is a closed grain that doesn’t accept stain very well, especially after we sand it so well. So we introduce water to open the grain back up; then it accepts the stain well. We use the sprayer to get the water on the floor, and then the applicator spreads it out nicely.
20) Staining

After the floor dries, we pour the stain using a water pail and hand-wipe it in. We feel this method gives us a more uniform, better look for longer compared with other methods such as using a buffer. There’s another technique where you put the stain pigment into the finish, but when you pull finish with pigment, you have to be really careful to not create streaks.
21) Applying the first coat of finish

Once the stain is dry, we apply a coat of our oil-based floor finish as a sealer. With this applicator, the finish goes into that tank and has a little lever that controls the speed of the finish coming out. That way every person applying it can do so at their own pace.
22) Buffing, vacuuming and tacking


After the sealer is applied, we buff the entire floor. When you apply the sealer, the grain raises again; the buffing process roughs the finish to accept another coat but also knocks down the grain raise. After buffing, we vacuum and tack the floor. For tacking, we use a towel with the recommended wood floor cleaner on it to pick up any extra dust. Again, keeping your workplace clean is important.
23) Taping out the rest of the game lines


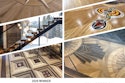
After we’ve buffed, vacuumed and tacked, we start the taping, using the taper again. For straight lines, we use tacks and a string: I tack on one end and then pull the string to the other end. The longest part of a painting job is typically putting all the tape down and laying all the lines, making sure everything is in the right spot. We probably use about 36 rolls (two cases) of 3M ¾-inch tape. Our process for taping is to start with the most important areas and work toward the least; so, we put the basketball court lines down first, then the volleyball, then the next, and so on. That way, when we pull the basketball court lines, it should pull up all the other tape lines with it. This court has lines for basketball, volleyball (cross-court), and two cross-court basketball courts, as well as agility ladders.
24) Applying the stencils

As we’re taping out our lines, we begin applying our stencils for the central logo. We apply the stencils and cut them out using a knife. Then we paint it and pull the stencil back off.
25) Oil-based paint


As our tape and stencil are going down, we can begin applying paint. We use mostly oil-based paint on our projects. For this project, we used a variety of colors and used about 4 gallons of the orange and about a gallon of the rest of them. We used a 2-inch roller to apply paint on the game lines for this job. We buy the 18-inch rollers and cut down a bunch of them ourselves.
26) Pulling the tape


The oil-based paint usually dries in about an hour, and then we can begin pulling up all the tape and stencils from the floor.
27) Sanding off paint drips
After the lines are painted and the tape gets pulled, I go around with a Festool DTS 400 and sand out paint splashes and marks, typically using 120-grit or less. Because I have a coat of finish on it already, most of the paint comes up pretty easily.
28) Second and third coat of finish

Before our second coat of finish, we abrade everything again. After we apply our second coat, it will need to dry before we abrade, clean the floor and apply our third and final coat.
Then, for this project, they had to drill six holes for the inserts for the volleyball court. The project was about six weeks from beginning to end.
SUPPLIERS:
Abrasives: Norton SandDollar | Big machines: American Sanders | Finish: Rebounder Classic, Rebounder Ultra | Moisture barrier: Aacer Stop15 | Moisture meters: Delmhorst, Wagner | Nailers: Powernail, SENCO | Paint: PoloPlaz Fast Break Paint | Wood flooring, Subflooring: Aacer Flooring By Infinity, Aacer ScissorLoc
Finding an imperfection


Finding an imperfection
Throughout the process, our crews are always on the lookout for issues with the boards, dents, cracks or imperfections. In this case, after we sanded, another company was there and created this damage. We removed the top 5/16 of the board for what we call a veneer fixing, then laminated a board on top. We use the laminate board so that we can maintain the integrity of the tongue joint from the original board.—B.S.
The VERT factor

The VERT factor
By Steve Hayes
VERT, which stands for Vibration Energy Reduction Technology, is a patented engineered pad applied to the bottom layer of the ScissorLoc subfloor system for gym floors. VERT pads are designed to dampen vibration in the floor while controlling the energy return to the athlete. Too much energy return is a bad thing, as athletes have to adjust for excessive energy through their muscles, joints and tendons. So we wanted there to be good shock absorption, but we also wanted there to be a managed energy return into the athlete. The solution was to integrate technology that was already being used in downhill skis. Cyrus Schenck, an entrepreneur and owner of Burlington, Vt.-based Renoun Skis, was embedding this engineered resilient material into skis and found that it reduced vibration, which is a major issue when downhill skiing. I partnered with Schenck to bring the patented technology into the gym flooring industry. So far we have VERT installed in about 50 gyms across the U.S. We have professional athletes who are training on it, and we have colleges, high schools and middle schools competing on it, and the users tell us they notice a clear difference.
Steve Hayes is co-owner of Spring Hill, Tenn.-based Mission V Sports.