Hidey-ho, Keith Long with Thunderheart Flooring here. Let's go through, in detail, a staircase my wife and I recently installed in Fort Collins, Colo. So that we can discuss this in some detail, I'm going to go over this in several posts.
A little background on the area: Fort Collins is one hour's drive north of Denver, and one hour south of Cheyenne, Wyo. The city is nestled up against the foothills where the Rocky Mountain Range begins, and is about a mile high in elevation. Fort Collins is home to many technology and engineering firms, including Hewlett Packard, Woodward Governor, and Teledyne Water Pik. There are lots of great people, scads of fancy homes, and currently plenty of commerce going on.
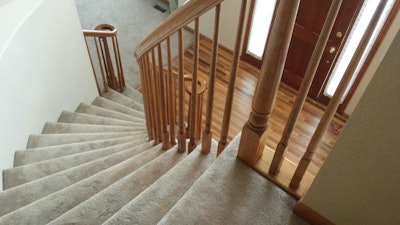
This home had been recently purchased by the clients, and we were able to perform the work before they moved in. Here was what the stairs looked like when they bought the home:

They initially talked with us about putting in red oak treads and Medium Density Fiberboard (MDF) risers. I explained to them that MDF as a riser material, especially with a young child and a large dog, probably wouldn't set them up for success, as it could get scratched and kicked up in that location. They mentioned that they wanted white risers, and didn't want to paint oak risers, as they feared the grain would show through. After I explained that S4S (Surfaced 4 Sides) poplar could be primed and then painted white, while being both smooth and able to stand up to the rigors of their lifestyle, they opted for that.
We pulled the carpet, carpet pad, and tack strip from the stairs. We undercut the balusters and the two bottom newell posts with an oscillating saw. It's probably best to put a used blade on for that, as there are sometimes finish nails going through down there. I label the balusters, usually with blue tape, 1A, 1B, then 2A, 2B, etc., so I know exactly which piece goes back where. We knocked out an oak plug on the underside of the handrail where the main length of rail tied in near the newell post at the top of the staircase, and used a ½ inch wrench to back a nut and washer off a bolt that was holding that joint together. With Robin supporting below, one tap with a rubber mallet had the handrail free:

We contracted to install the existing balusters, newell posts, and handrails back, so at this point, we did some simple math. We had cut the newell posts on the first step off flush with the top of the level of that step with nothing on it. The tread we put on that step is 1 1/16 inch thick. We had cut the balusters on the rest of the steps off flush with the level of those steps with nothing on them. However, the way those steps are built is with 5 ¼ inch stair nosing and a piece of riser material, both of which are ¾ inch thick. So, we cut the difference between those two thickness figures, 5/16 inch, off the bottoms of both the newell posts that will be set on top of the new oak tread on the first step, and the balusters set back in place without needing to be undercut.
This is the type of tool I use to mark the depth of the bullnose that the carpet was wrapped around on the treads:

I'd like to acknowledge Daniel Ankenbrandt of PDQ Floors in the Fort Lupton, Colo., area-he was generous enough to let me hire him to walk me through my first two winder staircases. He turned me on to this tool and many of the techniques shown here. In order to allow the risers to be installed upright and on the level, the bullnose on the treads needs to be cut off. It's a balance, though-they need to be cut off so none is left overhanging where the risers will go, but not so far back so that the tread ceases to be supported. Most of the time, this bullnose overhangs about 1 ¼ inches. However, it has always amazed me how much variance there can be in overhang, even in the same tread. So, I turn this little square with level upside down, and test how much needs to be cut off from the underside of the bullnose. I then set the square to the appropriate depth, turn it upright, and transcribe that depth to the top side of the tread:

To cut off on the line, most of the time I use a Skil saw. My reasoning for this is that I have yet to get through a flight of stairs without hitting some steel during this part of the process. Sometimes nails, but most of the time it's crown staples being used to fasten the tread down to the riser. If I know I'm going to trash out a saw blade, I'd rather use one that costs a couple dollars than one that costs several times that (such as on a track saw). Generally my wife gets a vacuum going and holds the wand where she can get most of the dust contained as it is created. Here are the stairs with the bullnose cut off:

There will be a couple to a few inches near the wall that the Skil saw won't get. At first, I used a rotary tool (the one I have is a Roto Zip), to finish off the cut on the line. More recently, I've been using an oscillating tool (the one I have is a Fein brand). Have gotten more consistent results with that. Many times, the staircase is set, then finished over with drywall. This leaves the bullnose being cut off recessed in the drywall. I'm careful to get it cut completely, then am watchful while removing it, making sure the drywall stays intact.
When first getting going in hardwood flooring on my own, I ran with other contractors that were busy and could use an extra hand. My wife Robin suggested I do this, as she did the same when she was getting into farrier work. She told me, "You'll probably pick up some pointers. If not, then you'll become aware of some things you don't want to do."
As contractors, I'm not suggesting that we all do things the same way. However, running with others and seeing some of their nifty and time-saving tricks has made my contracting career easier and less stressful.
When I had more free time on my hands in the fledgling years of my hardwood flooring business, I would take seasoned general contractors out to lunch and ask them what they felt I should know about construction and business. My thinking around this was that if they had made a career out of it, and had passed through the fires, so to speak, that tapping into their wisdom was a good idea. Why reinvent the wheel, right? Although I picked up several pearls of wisdom doing this, the most memorable was from a salty old retired general contractor. He told me, "Keith, it's important to do the best job you know how. That being said, the average homeowner isn't going to know whether you give them a quality floor or not. However, every homeowner will know if you leave their house a mess at the end of the day. Being tidy will probably land you as much work as being good."
I'm shooting for Part 2 of this staircase series to be up next week. Stay sharp!
[Editor's Note: Part 3, Part 4 and Part 5 are now available, too.]