Keith Long here with Thunderheart Flooring to continue on the winder staircase.
In our last post the first tread had been glued and clamped overnight, and now it's ready to be marked and cut.

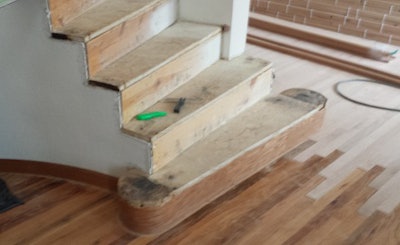
I cut off the overhang around this profile on both sides of the first step. This way, the 1 ¼-inch overhang will be the same all the way around once it's installed. A jigsaw, RotoZip or oscillating saw works; I definitely tread lightly if the existing riser material is going to stay in place as the finished product.
If you are going to put hardwood veneer on the first riser, now would be a good point in time to do it. On this particular job, I had laced in new red oak flooring to add onto the existing, and there was a height discrepancy up against the first riser. So, I waited until after sanding to install the walnut veneer.
I normally use sticky-backed veneer. I can cut it to fit either on the table saw or with a pair of scissors, then peel the protective layer off the back as I wrap it around and let it adhere. To avoid wrinkles or bubbles, I've found it's quite a bit easier with two people than one for this part of the process. If the veneer is not sticky-backed, contact cement can be applied to both the back side of the veneer and the surface it will go to on the riser. After it flashes off, the process for application is the same-an extra set of hands comes in handy.
I cut the 1¼-inch bullnose off a piece of stair nosing. With the first tread blank set in place on the first step, I took a small piece of this bullnose and used it on the underside of the blank as a guide to trace the overhang.


In hindsight, at this point, I could have looked more closely at the curve before jigsawing out the line. There was a bit of a flatter spot in the wraparound on one side of the riser. When I scribed around, that flatness transferred to my line. It would have been more pleasing to the eye had I sketched that curve a little more round and uniform before cutting. By my way of thinking, if the overhang is a little more in one small spot, but looks more uniform from the top side, that would be better.
Fortunately, I was able to pretty it up as I used a random orbital sander on the side profile of the tread.

I do this every time anyway in preparation to round off the profile with a router. Speaking of which, I always use a stair tread scrap to get the depth of the roundover bit dialed in. There's a lot of time and effort in this first stair part so far, so I don't want to use it as the testing ground and possibly discover my bit is set too low.

I like to round over the tread from the top and bottom sides, both to center. This creates the same profile as a stock tread blank and fits in visually. Once done, I hand-sand this newly created profile before installation. It's easier to do up on a bench than hunched down trying not to scuff the newly installed veneer.

I like to dry-fit stair parts before gluing and fastening. The rise and run is critical, not just to be up to code, but to make sure that there is no trip hazard if one stair is run in or out too far. I take a straightedge and run it down the stairs, making sure there are no humps or valleys, before I pull out my glue or nails.
I like to run thick, generous beads of glue spaced apart while gluing in treads and risers:

I was taught that this creates a suitable bond. As far as nails go, I put one 2-inch, 15-gauge finish nail on my center marks under where each newel post will cover it up. I'm under the impression that the nails hold the stair parts in place until the glue dries, while the glue, once dry, is what keeps things in place for the long term.
Speaking of long term, I model my business for the super marathon. Sure, I keep putting one foot in front of the other, and tend to the day-to-day work and related issues that produce quality floors job in and job out. However, I also read everything I can about those contractors that have already done what I'm planning on doing. I ask questions of and network with those I look up to and admire. I set a percentage of my income from flooring aside to take classes and buy tools to become better at my trade. [Note from the editor: Read Keith's article from the October/November 2013 issue about doing just that at this link.]
Your questions and comments are welcome. Let's pick this up again next week, and see if we can get a little further up this flight of stairs. Until then, stay sharp!
[See the other posts about this project: Part 1, Part 2, Part 4 and Part 5.]