Keith Long with Thunderheart Flooring here to continue with the winder staircase we started.
On the last post, there was plenty of deconstruction, which as a general rule requires less thought and more brawn than the reconstruction. So, let's shift gears mentally and pull out the clipboard and some finesse.
Speaking of the clipboard, it's the first thing in and the last thing out of my job sites each day. As I think of things I'll need for the next day, or to replenish my stock of spline, adhesive, saw blades, et cetera, I stop what I'm doing and write it on the clipboard immediately (smartphones work for this purpose too, if you have one).
When estimating materials, I attempt to have enough quality material available while still minimizing waste. With a red oak floor such as this, extra nosing or riser material left over can get worked into other jobs relatively soon, so I ordered a little extra of each, just in case one was mismilled or didn't have a grain or color pattern that fit in with the job site.
The treads were just about 42 inches long at the longest point, so I ordered 8-foot red oak stair nosing that was 5 ¼ inches wide. One 8 footer did two treads. I then ordered two 8-foot 3 ½-inch-wide red oak stair nose pieces so I could rip the bullnose off them and build in the mitered returns on the sides. This floor was contracted to be stained relatively dark: two parts Provincial to one part Spice Brown. So, I wasn't as concerned with grain orientation between the mitered returns and the stair nosing piece. If the floor were going a lighter hue on the stain, I might have ordered the 5 ¼-inch stair nose pieces longer, and grain-wise made the mitered return a continuous piece from the same stock to make it pleasing to the eye. To back-fill the rest of the steps that had nosing, I ordered twelve 42-inch red oak risers, and three 48-inch red oak risers. This stock is ¾ thick by 7 ¼ inches wide.
For the risers on this job, I ordered seven S4S (Surfaced 4 Sides) poplar boards that were 8 footers. The homeowners primed them before installation and then painted them in place at the end of the job. They were also ¾ thick by 7 ¼ inches wide.
For the first step, I ordered a 6-foot red oak tread, and brought from my shop an extra red oak 36-inch tread scrap I had.
I brought some sticky-backed black walnut veneer for the wraparound on the first step. I buy walnut and red oak veneer in full sheets and stock it in my shop, however, it can be purchased in smaller quantities if desired.
I purchased 40 linear feet of a simple profile red oak trim for finishing off the sides. I didn't need quite that much, but wanted to have options. It was reasonable enough on price that I'd rather spend a few dollars extra on that than risk having to break my rhythm to go back to the store just for that. Plus, the extra will work in on another job.
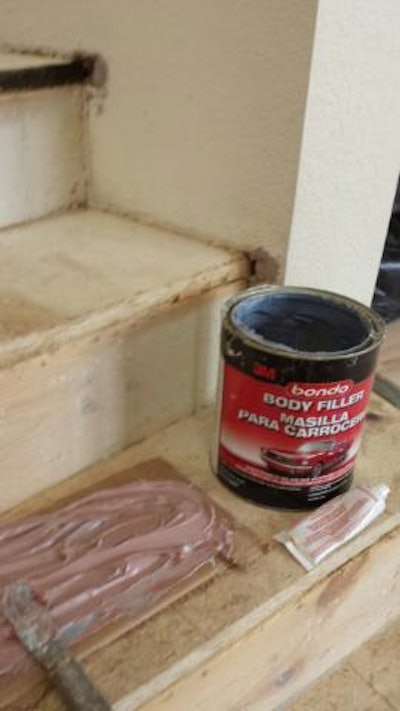
The homeowners opted to keep both sides of the winder staircase drywall, without ¼ inch ply hardwood stringers. So, there are existing voids that need to be addressed.

I was taught to use Bondo, which is auto body filler, to fill these holes where the drywall wrapped around the bullnose. It comes out of the can gray. If applied straight, it will take several hours to dry, and probably two or three applications to get it looking acceptable. However, there is a tube of accelerant inside the lid. It comes out red, and can be mixed with the Bondo to make it dry faster. The more a person adds, the faster it dries, even in as soon as a few minutes. I can now get these holes filled and looking acceptable in less than an hour, with only two passes required. The ¾ inch of the hole closest to the staircase will be covered by the riser, so it's not absolutely necessary to get the entire hole filled flush, just the part that will be seen once the stair parts are in.
Fair warning to all contractors and homeowners out there: This smells as bad as any type of stain I have ever used. I wear a respirator and nitrile gloves and open windows while applying. If sanded on, I know the auto body guys use gloves and respirators. I don't generally need to sand on this, but if I did need to, I would follow suit with the appropriate hand and lung protection. I mix the product with the accelerant on a piece of cardboard and apply it off of that. I don't use my favorite putty knife for this part, as any that sets up before cleaning tools is tough to get off. Besides the fast dry time, another advantage is that it's paintable.

At this stage, I made note of where the center of the newell posts were on the first step before installing the hardwood tread. Having this information written down helped when installing the newell posts later. Once the first step was glued and fastened in place, I took a nail set and marked where the center of the posts should go back. These marks got covered, so they weren't seen in the end, but were great points of reference while reinstalling the newell posts and handrails.
I set the 6-foot red oak tread blank on the first step and squared it up. Knowing I wanted to end up with a 1 ¼-inch overhang beyond the riser, I calculated how much I would have to cut off the back side, and at what angle. The piece that was cut off was then used to back-fill the void just to the right. The void to the left I cut from the 36-inch red oak tread scrap I brought from home.
If one looks closely, I have spline laid out on the above picture. I routered, glued, and splined these pieces together, on both the left and right. However, it's a fine line between getting a good bond, and going too far with the router. If a person goes too far with the router and spline, it will show up on the side profile of the finished product. So, I measured where I would end up cutting after the glue dried, and stopped the routering just before those points.

I had plenty of other things to do on this job, so I left this first tread clamped up overnight. Recommended dry times for adhesives, stains, and finish is one thing I don't like to compromise on. By my way of thinking, having to redo something as a result of trying to force products to perform before the manufacturer says they are ready is flirting with disaster, definitely not on my priority list. It didn't put me out to work on other aspects of the project while this dried.

It will probably take three more posts to get this staircase wrapped up. Your questions and comments are welcome. I am hoping by the time we get through with this series, many of you will have the confidence to try your hands at this.
See you next week!
[Editor's Note: Part 3, Part 4 and Part 5 are now available.]