


Back to that custom engineered job we've been discussing (see Part 1 and Part 2)...
After going back and forth with my client and Oshkosh considering different wood species, we finally had a decision made. My client asked to see a few (actually I think it was four or five) different design options before making a decision. I think Jennifer at Oshkosh got a little concerned at some point because I got an email from her explaining to us that the colors in the drawing were not 100 percent realistic and there would be some color variation in reality. I assured her that the medallion was a GO and my client just needed a little extra time to commit. Sure enough, he did, and we placed the order. I order my medallions (when I don’t make them) a 1/16” thinner than the actual floor. That leaves room for the adhesive. In this case, the floor was Owens Plank that was 5/8 inch thick, so I specified the medallion thickness to be 9/16 inch.

Here are the basic steps in medallion installation:
· Mark your medallion location and have your client approve it.
· Mark the medallion orientation (especially on north star compass-style medallions) and have your client approve it.
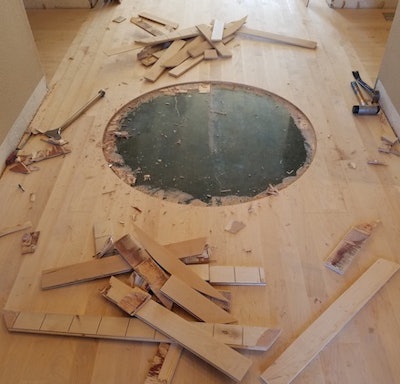
· Place the template with the right side up. Your template is tapered so if it’s upside down you will end up with a gap.
· Use a powerful plunge router from this decade (Lenny Hall!) and rout away.
· Once done routing, clean up the subfloor.
· Dry-fit your medallion.
But how do I get it out once it’s in? Good question. If you have knockouts in the medallion, attach screws to those areas and use a pry bar to lift the medallion. If you don’t have knockouts, use shrink-wrap strips under the medallion to lift it. Then…
· Apply the correct adhesive and drop the medallion in place.
· Put some weight on the medallion until the adhesive sets.
· Please go to NWFA schools and learn how to do this before you butcher a nice medallion.
· If you can’t handle pressure, stick to no medallion jobs. A simple mistake in this type of work and you’re in for a big fix and a lot of money out of pocket.
· Let the medallion acclimate in place before you sand and finish it.

My client now asked for custom-curved diamond shapes in the hallways. I had to make a jig to cut the positive blank and a negative jig (template) to install all the inlays. Oh, and he wanted a wenge stringing around each inlay. Could I do it?
Hell, yes!
Next time I will discuss how to make and remake (that's a long story) an inlay with a template.
Be cool.


