Hello, Keith Long here with Thunderheart Flooring. We had John Kimminau of Kimminau Wood Floors out from the Kansas City area this last week. Ben and his brother John are three years into owning and operating their wood floor contracting business. They impressed me in a good way from the start when we met at the NWFA Expo in Dallas in 2013. We sat in on some classes together there and ate dinner with a group of contractors one evening. As they asked questions about tools and techniques, and shared their vision for how they would like to develop their business, I got a feeling they were setting themselves up for success.
We stayed in touch over the next year, calling one another to bounce business ideas or technique off each other. After Expo in Nashville this year 2014, I stopped by on the way home and ran with them for three days in Kansas City. I had a great time on a job site with them there and got to know them a little better. John mentioned that he'd like to become more proficient at stairs and wanted to know how to install herringbone. So, he came out for a week, and we did a flight of stairs with an inlay in the landing, and put a 5-inch walnut handscraped herringbone in this room:

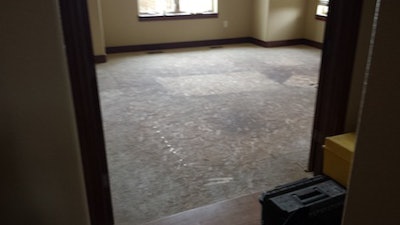
My wife, Robin, had been through the job site the day before and pulled the carpet, carpet pad and tack strip. When John and I arrived, we scored the caulk line on top of the trim and removed it, pulling all the nails from the baseboards and walls, and numbering them so they would be easy to put back. Once staged safely out of the way in another room, we checked the subfloor for flatness. It never goes out of style to flatten the substrate. However, since we laid a herringbone pattern, we wanted to make sure that the subfloor was as flat as we could get it.

The homeowners have select 5-inch American cherry in most of the rest of this main level of their home. The husband mentioned that he wanted something different in this room, which is his study. He showed me a picture from his computer, which was a 5-inch rustic walnut herringbone, and mentioned that he wanted it to look distressed.
While pricing out ¾-inch solid 5-inch walnut tongue-and-groove flooring, I was getting a bit of sticker shock, and could only locate select or No. 1/No. 2 common grades mixed together. So, I went to Sears Trostel, a local lumber yard in Fort Collins, Colo. I have a great relationship with the staff at Sears Trostel-I feel like Norm Peterson walking into the bar at Cheers when I go in there. They carry an impressive inventory of native and exotic hardwoods, plus a full line of power and hand tools. They have a separate location that is a full-on production facility, and can fabricate anything that can be dreamed up. While waiting on coats of finish to dry, it's a great place to go find those special boards for inlays or drool over tools.

After explaining the look we were going for on the project, Josh showed me a rack of 6-inch rustic-grade 2A walnut. This material was rough-cut on the sides and planed to 15/16 inch thick. There was the occasional saw mark on a couple of the boards, but just on one side, which could be either turned down or hand-scraped out. There were plenty of sound knots, and the grain had tons of variation. I communicated to the homeowner that we could get the rustic look he was going for with this material, and have double the wear layer if I milled the groove in the same place as ¾ inch thick flooring. I also communicated that this floor would be higher than the cherry that was already there, but that we could scrape the entrance to the room down to reduce and make a gradual transition from to one species to another. "I like where your head's at, go for it," was his reply.
Calculating what to get was relatively straightforward; Josh with Sears Trostel and I figured it this way:
• The room was 16 feet by 16 feet, or 256 square feet.• There were two 2-by-3-foot pillars recessed in from the main set of windows, totaling 12 square feet less.• So, 256 less 12 comes to 244 square feet.
Sears Trostel straight-line-ripped the 6-inch-wide rough-sawn material to 5 inches. The wood was so much more economical that it was still worth it to go this route.
• Each linear foot 5 inches wide is 0.416 square feet.• The planks were 10 feet long, so the waste factor wouldn't be as great as cutting herringbone from nested bundles of flooring. I figured 30 percent for waste, so 244 square feet total surface area times 0.3 equals 73 square feet more, coming to 317 square feet.• 317 square feet divided by the .416 square feet per linear foot comes to 760 linear feet of 5-inch material needed.• Since the planks were 10 feet long, that was 76 planks.

In order for the pattern to work out, the length of herringbone must be a multiple of its width. I was considering going either 5 wide times 4 equals 20 inches long, or 5 wide times 5 equals 25 inches long. To account for a little end-checking, these rough sawn 10-foot planks were actually 10.5 feet long. Cutting the herringbone 20 inches long yielded 6 pieces per plank, with a couple inches on either end to cut out the end check. The prospect of cutting the herringbone 25 inches long only yielded 4 pieces per plank, with 20 inches of waste per plank. So, in the interest of it being a much more effective use of material, I decided the 5 inches wide by 20 inches long is the way I would cut it. 5 by 30 would also have been low waste, but I felt too long of a piece for a room this size.

It's less time down on kneepads to hand-scrape at hip height on a bench. For a herringbone pattern especially, it's nice to scrape these long-length boards before they are cut. If there is the occasional high-low once installed, they can be dressed up in place. I have used various hand-scrapers over the years. The one you see in the picture above was turned by another hardwood flooring contractor in Colorado named Jeff Ullum. Besides floors, he does carvings, wood turnings, and all kinds of other wood crafts. The scraper blade is made from an old cashed-in table saw blade. I tried out the hand-scrapers at the Expo in Nashville-they seemed to do a nice job, too.
Notice in the above picture I waterpopped the raw wood prior to scraping. I do this for two main reasons. One, it opens the grain and makes the scraping easier. Two, it lets a person know where they've been. If it's still wet, it hasn't been scraped yet. I clamp the boards to the bench so that I can put some elbow grease into it.
Robin cut off the end check, then had a stop block in place on the miter saw set to exactly 20 inches. She would check a board periodically with a steel ruler to make sure we were staying true, and fortunately it did through the project.
Let's meet up next week to calculate our layout and start installing. Stay sharp!