Keith Long here with Thunderheart Flooring to wrap up the hand-scraped walnut herringbone project (see Part 1, Part 2 and Part 3).

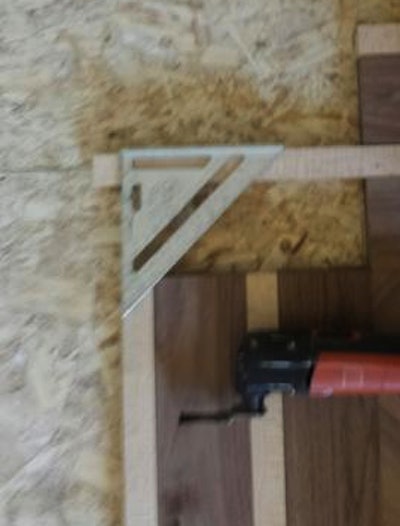
I ripped down some of the 5-inch walnut to 4 inches for these two rows of the border, as I estimated it would be more pleasing to the eye. We hand-scraped the curly maple also, ripped it into 1 3/8-inch strips, and passed it through the router station. So long as a person has the pattern and these two widths, all the dimensions needed to create the French knot can be calculated. Notice on the above picture how I allowed the strip of curly maple to run wild through the pattern. Its exact length could be calculated when installing. However, I have found it less time consuming to run it past, then square up once all four rows of this portion of the border are in. The excess can be cut off in the exact right location with an oscillating saw.

The first time I went to design this pattern, I had no frame of reference to bring it to fruition. I got on YouTube and tracked down a video that can be found under "Nylin Floors Herringbone." After watching the video a couple times, I paused it on one of the closeup shots of the French knot pattern, got a pencil and paper, and sketched it out. From there, I decided which widths I wanted my border to be, and could then calculate the dimensions for the floor I was about to do.
If I were to do this type of border again and had several knots to build in the corners, I would build a sliding table saw jig to aid in the speed and accuracy of this aspect of the project. If I had to pick a favorite course I have taken through the NWFA, I would say it was Jigs and Medallions. It opened my mind to many new possibilities for custom flooring. Once a person knows how to build a sliding table saw jig, stops could be set to produce each of the necessary cuts for the French knot quickly and with a high level of precision.

In this photo above we are in the middle of the border installation. I opted to miter the two inside corners at the beginning of this bumpout for the window, as I figured two French knots so close together would have looked odd. There were two heat registers and one cold air return in this room. Since we went into so much detail on this floor, it would have been a shame to drop metal vent inserts in on top. I got out some ¾ solid walnut flush-mount vents I had in stock, shimmed them up to meet the 15/16 thickness of this floor, and hand-scraped them.

Not knowing exactly how much waste we would have, we didn't hand-scrape all the material up front, just about three-quarters of it. Once we got down to the last two rows of 5-inch to complete the border to the wall, we could figure out exactly how many more planks to hand-scrape, while leaving the rest of the stock milled flat for another project. Robin grew up training and shoeing horses on the western slope of Colorado, and is no stranger to hard work. When she shows up on a job site, her standard question is, "What am I doing today?" I get her oriented to the project, and she gets in there, tough task or not.
That being said, I like to share the physically demanding aspects of the job with those working on the job site. In my opinion, it's not a recipe for success to get a new employee, stick him or her down on their hands and knees racking wood for two days, then edging all day, then still down hand-scraping and hand-sanding corners. I'm considerate of those working with me-if I tell them to do only the things that make them feel as if they got hit by a linebacker at the end of each day, I shouldn't expect them to want to keep showing up to work. With hardwood flooring, there is critical thinking involved, and plenty of chances to balance physical labor with planning, preparation, and keeping the job site tidy.

I opted to miter the corners of the last two rows of 5-inch walnut that complete the border. Once in, I hand-scraped any overwood in the room. There was almost none in the field; I probably spent only a half hour there. On the border, I spent a couple hours getting it how I wanted it. Toward the end of this part of the process, I felt like I was in the 24th mile of a marathon. I was asking myself, "Are you charging enough to do this?" as I was sharpening, scraping, sweating… sharpening, scraping, sweating. Fortunately, I had taken the advice of Mark Scheller, the lead instructor at the Expert Installation course I took through the NWFA. He advised those of us on his panel, "There are always unforeseen things that come up on job sites, things that couldn't have been accounted for. Charge enough for your work so that you can gladly address these unforeseen things, and still be profitable."
As far as sharpening the scraper goes, whether hand-scraping or scraping corners on a sanded floor, I sharpen my scraper blades off the hardwood floor. This keeps the metal filings from landing on the floor and potentially contaminating the finished product.

After vacuuming, I hand-sanded with the grain using 8-by-10-inch sheets of 220-grit sandpaper folded in half, then down into thirds. That way, a person has six different surfaces that can be used. This helped to knock down the fuzziness that can occur in spots on hand-scraped walnut. Although it took time and effort, I view it as time well spent. It made finishing lots easier:

Designing and fabricating custom floors brings me satisfaction. It never gets old to see homeowners beaming with pride, gladly writing the final check for the improvements made to their homes. When the job is all closed out, and we're saying our goodbyes, I generally give homeowners about a dozen of my company's business cards, and say, "Pass these out like they're candy on Halloween!" Many of them do. It saves the advertising budget a bunch to have happy people singing a company's praises to their friends, family, and anyone who comes to their home and exclaims, "Wow, who did your hardwood floors?"
The first two days John Kimminau was out to Colorado helping and learning, we installed a staircase and an eight-point Celtic knot in a landing halfway up the stairs. Let's explore that project next-until then, stay sharp!