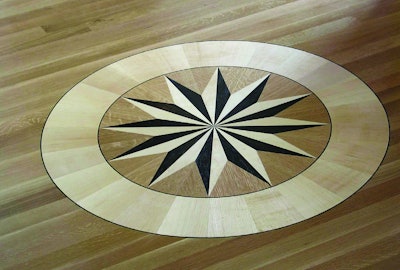

I have found over the years that a great way to upsell a job or make yourself stand out from the competition is to add a custom border, medallion or inlay. The only problem is that these items can get expensive, and if you are throwing one or more in to get the job, you certainly do not want to spend any more money than necessary. A great way to keep your cost down is to make them yourself. All you need is your table saw, some Baltic birch plywood or MDF (multi-density fiberboard), stock that you can pull from scraps in your shop or storage, and a few basic math skills. Here is a simple medallion I made just to get a 1,200-square-foot project that I would not have otherwise received. For the couple of hours it took to make and the $30 or so in total material involved, I felt it was a fair trade. In these trying economic times, it may be the craftsman in you that allows you to stay busy. Here is how to make a sled for this medallion and the center of the star.
SUPPLY LIST
- Table saw
- Chop saw
- MDF or Baltic birch plywood
- Scrap wood
- Wood glue
- Brad nails
- Packing tape
- Blue tape
- Eye protection
- Hearing protection
Step 1

Decide on the material and dimensions for your sled. Choose material that is relatively smooth and stable. Baltic birch is best, but for cost and availability reasons, we chose ¾ -inch MDF from the local hardware store for this sled. We cut this particular piece to 24 by 30 inches, which should be more than large enough to accommodate our pieces.
Step 2

Make the "runners." They should be the width of the slots on the table saw and just high enough to be flush with the table. Most table saw channels are ¾ inch wide by 3 / 8 inch tall, but these measurements can vary, and it is extremely important to make your runners exact. Any play in the width or height will result in inaccurate cuts.
Step 3

Mount the runners. Your table saw fence should be set square; lock it down where you choose to set your runners. A thin bead of glue, a couple of reference lines and brad nails should do the job. Make sure your brads are shorter than the total thickness of your sled and runners. In this case, we used 1-inch brads. Our total thickness was 1 1/8 inch.
Step 4

Set and square up your fence. Raise the blade about 6 inches from the top of the sled and push it through until it's about 3 to 4 inches from the bottom. Don't extend the blade all the way through the top or bottom. Square the top and bottom fences to your blade (this way you can use this sled for cross cutting) and mount them with glue.
Step 5

Next we designed a 12-point star. Since there are 360 degrees in a circle, each point should be 30 degrees and each half 15 degrees. With a chop saw, make a 15-degree angled cut out of a spare piece of plywood or MDF. Line that piece along the kerf that the blade left in your sled and tack another long piece of stock to your sled. This will serve as the fence for your star points.
Step 6

Size your stock. You can use ¾-inch material, but thinner stock is more dimensionally stable, more accurate to cut odd shapes with and safer to cut, as your blade does not need to be set as high. For this medallion, we cut 24 total pieces of material along with a few extras. Allow yourself plenty of material to keep your fingers as far from the blade as possible.
Step 7

To make the first angled cut, run your blade through your angled fence. Using a square, tack a stop in place so that your stock will be cut to a point once the blade cuts through. Turn the saw on, hold down the stock tight to the fence, then stop and run through. Repeat this step for all of your pieces.
Step 8

In this case, the star is 24 inches, so each point is 12 inches long. For the second cut, measure 12 inches along the fence from where the blade intersects. Then flip the stock over so that the angle just cut faces the blade. Set it at the 12-inch mark and tack another stop in place along the top edge.
Step 9

Holding the stock on the side of the piece that you intend to save, cut the pieces while being mindful of the blade.
Step 10

Cut enough pieces to make a quarter of your star. Using your table saw fence and square, check to see if you are accurate. If you are off, you may need to adjust your fence angle slightly. Once your cuts are correct, cut all 24 pieces. Repeat this process for background pieces, keeping in mind that the angles will be different.
Step 11

Tape all the pieces together with packing tape on the face and blue tape on the bottom. Place a circle template on the underside, and tack it down with 5/8 -inch brads. With a bearing bit, rout out your circle. Flip over, remove the tape and you are ready to install.