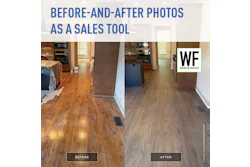
Chris Rock once said that when you date someone the first time, you meet their representative and not the real person. True? I think so. Why is it that we try to make everything prettier than it is? We are who we are. Same goes for your floors. Wood is a natural product. It is not perfect. Or I should say, it is not obsessive-compulsive-compliant. It has straight and curved lines, dark and light, figured and burly, soft and hard, and the list goes on. Yet, when we make samples we try to make them perfect. Remember the last sample board you made for a client? It never really matched the end result when you finished the whole floor, right? That's because we never were taught how to make samples the right way.
I remember an instructor at one of the NWFA technical schools talking about sample making. He said that once the client approved the sample you should throw it away. He was making a point that the sample never matched the actual finished floor. Instead of dancing in the dark with your sample making techniques, try this: Train yourself to make samples that are very close to your finished floor. This way you take the guesswork out of what the floor would look like. Have the client approve and sign the sample. Then, keep the sample out of sight for reference should the need arise. Last but not least: Talk to your client about how the floor might look more green, red or brown. Mention how the floor might look darker or lighter and explain why. Remember the word "expectation." What is obvious to you is not to them. Next time you make a sample follow these simple guidelines:
Match the age of the wood. If you're doing a white oak refinish and your sample is made on new white oak, guess what? The sample will have more green in it and no red. The existing white oak has a lot of patina in it and will show a lot of earthy, amber red tones. Let's say your client wanted a brown stain. You made the sample and they loved it. They loved the green hue and the brown color that had no red in it. So, you get to work and sand the floor. Once you hit the old white oak with stain you notice that it is a little redder than your sample, but not too bad. The next day you apply finish and guess what, can you say red, red wine? Now you're sitting there holding your green-brown sample and looking at a reddish-brown floor. Next time, make samples on old white oak. You should save some from previous repair jobs. If you don't have any, make samples on the floor itself in areas like appliances, closets. etc… (See Roy Reichow's blog post about samples in the HF Inspector Blog).
Don't make it pretty. Most likely you will make a sample using only a board or two and have it scratch-free. You will make is so uniform in color and sheen, and that's what the client will expect: perfection. Instead, make a sample about 2' x 3' (.609 - .914 meters) instead of using one board. That will help show the variation in color. Pick and choose different grain and color boards. Don't cut the sample out of two long boards. Then, leave some fine scratches in it. Try to be a little less than perfect. It will save you a lot of trouble in the end. I always try to make a sample less than perfect. If I know the client will try to test the finish durability by scratching it, I even compromise the drying conditions so that when the actual floor is done, it will outperform the sample.
Match the actual floor. When you're showing a sample board for a new floor installation it should match the actual floor. Don't show an old jatoba sample without talking about color change. Don't show a sample board without any knots in it when the actual floor will have knots. As part of my never-ending learning I went through the NWFA certified inspection school. I got a call for an inspection about a client complaining that their new prefinished floor had many dark spots. Before putting on my super inspector uniform and looking for a bus so that I could throw the installer under, I asked a simple question: Well, where is the sample they were shown by the person who sold the floor? Be careful with custom colors. When trying to work with custom colors it is important to be organized and systematic. Most chances are that if you are playing around with colors, you already have what you need. I always have a note pad to record my formulas, measuring cups, tablespoons and a gram scale. It is a foolproof technique to replicate your colors. When you're done, keep a copy in the client's file for future use. For example, I use a red oak floor, sand it to 120 grit, apply stain x, then dewaxed shellac with one teaspoon of x tint per cup, then urethane satin, then abrade with 220 grit, then final coat. If you try to remember that, good luck. This example leads me to the next point:
Know your grits and the scratch pattern your machines create. (If you don't know what scratch pattern is, maybe it is time to go to a technical school). Let's say you hand-sand your sample or use a small orbital sander. Both will create a different surface on the wood sample. That will affect the color. Then when you do the actual job you put your big machine, buffer and/or multi disc on the floor. These machines create a different scratch pattern than your hand-sanding or orbital sanders. That is mainly why your sample and floor are different in color. To correct this, you need to know your machines very well. For example, you might need to finish sanding your sample with 100 on the orbit if you will be buffing the floor with 120. I know that I will use 120 on my sample if I use my Trio on the floor with 80. Again, know your machines and what they do.
In conclusion, communication is everything. Remember that you can never talk enough with your clients about the most banal details in the wood. They don't or cannot see what you see. They might be consumed by their work, lives, stress, kids, family issues, budget out of control… you never know. You are pretty much one more step they have to take to make their home contractor-free. They might not be seeing the small dark streaks in the maple wood or the rays in the quartered oak. Don't give them a mini sample to approve. Make the sample as big as you can. Remember, no matter what you were told when you were young, size does matter.
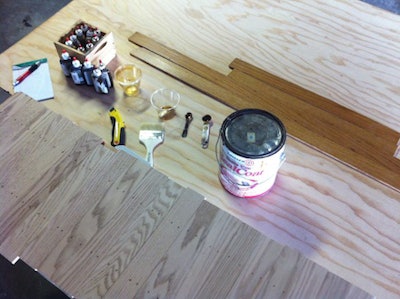
Here are a couple photos of samples I worked on when trying to match an existing floor. I went from red and brown on the ends to trying to control the orange and yellow in the middle boards. Once I recorded the results I made a new set of samples to fine-tune the closest two colors: